Hey there! Let's talk about setting up a wireless network. A successful installation of wireless network is about so much more than just plugging in a few access points. It’s really about creating a seamless, secure, and genuinely user-friendly experience for everyone who connects. Whether you’re setting up a network for a bustling school in the Education sector, a busy Retail store, or a corporate office with a BYOD policy, the end goal is always the same: a reliable network that just works.
This guide is your friendly blueprint for getting there, using the powerful combination of Splash Access and the Cisco Meraki ecosystem.
Your Guide to a Seamless Wireless Network Installation
Let's dive into the practical, actionable steps that make a real difference in a wireless network rollout. We'll skip the dense technical jargon and focus on what you actually need to do, from the first planning meeting to implementing cool Authentication Solutions that secure your network. This is all about building a solid foundation for rock-solid connectivity, especially with powerful tools from Cisco and Meraki.
The entire process of installing a wireless network really breaks down into three core phases: planning, installation, and ongoing management.
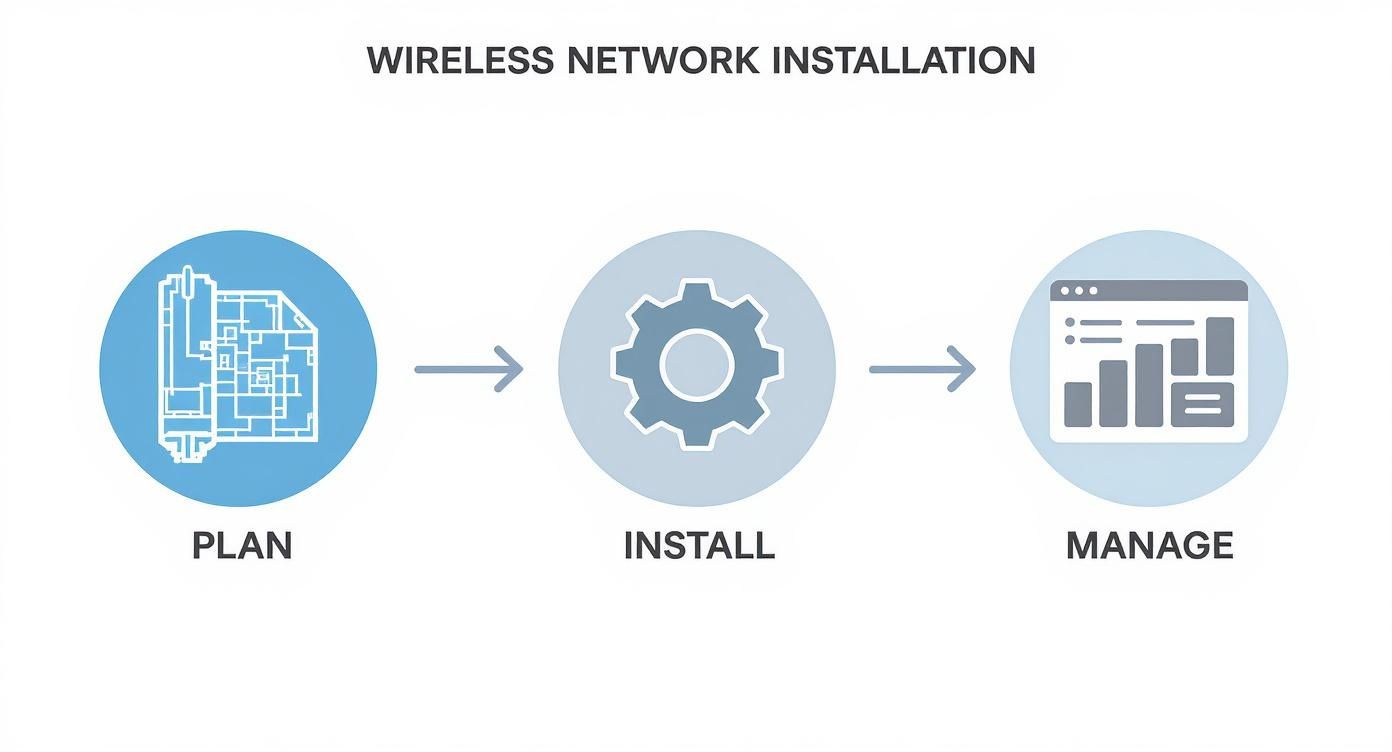
As you can see, a successful deployment isn't just a one-and-done event. It's a continuous cycle where each stage informs the next, making sure your network stays optimized long after launch day.
The demand for high-performance wireless is exploding. Consider the rapid adoption of 5G—by the end of Q2 2025, global 5G connections had already blown past 2.6 billion, which is a 37% jump from the previous year. This incredible growth shows just how quickly we're all embracing faster, more capable wireless technology.
To give you a clearer picture of the strategic process, here’s a breakdown of the key planning stages.
Key Planning Stages for Your Wireless Network Installation
| Phase | Primary Goal | Key Activities |
|---|---|---|
| Discovery & Assessment | Understand current infrastructure, user needs, and business requirements. | Conduct a site survey, interview key stakeholders, identify coverage gaps, and define security policies. |
| Design & Architecture | Create a detailed network blueprint. | Select hardware, plan AP placement, design IP address schemes, and map out VLANs and security configurations. |
| Deployment & Configuration | Physically install hardware and configure the network. | Mount access points, run cabling, configure SSIDs and Captive Portals, and implement authentication methods. |
| Testing & Optimization | Validate performance and security. | Perform speed and coverage tests, test authentication flows, and fine-tune RF settings for optimal performance. |
This structured approach ensures that you address critical needs upfront, which saves a ton of headaches down the road.
Building for Your Specific Environment
Every industry has its own unique Wi-Fi challenges. A corporate office grappling with a Bring Your Own Device (BYOD) policy needs entirely different security measures than a retail store trying to offer great guest Wi-Fi to shoppers.
- Education: Think about a college campus. The network has to be robust enough to handle thousands of students streaming lectures, collaborating on group projects, and connecting multiple devices all at once without a hiccup.
- Retail: Here, Wi-Fi becomes a powerful tool for customer engagement. It runs point-of-sale systems, empowers staff with inventory scanners, and provides guest access through Captive Portals that can be used for marketing.
- Corporate BYOD: Security is everything in this scenario. The real challenge is securely onboarding all those personal devices—laptops, tablets, phones—without creating a frustrating experience for employees.
A well-planned network installation directly impacts everything from productivity to user satisfaction. I've seen it time and again: forgetting the unique demands of your environment is a classic mistake that leads to poor performance and glaring security gaps.
The Power of Cisco and Meraki
Using the right tools for the job makes all the difference, and this is where the Cisco Meraki platform truly shines. It takes what used to be an incredibly complex process and simplifies it. From its cloud-managed dashboard, you can deploy, monitor, and manage your entire network from a single screen. For any IT team, that's a massive win. If you're new to this world, taking a moment to understand what Cisco Meraki is and its core benefits is a great place to start.
When it comes to the physical setup, precision is key. While many parts of a Meraki deployment are designed to be straightforward, getting the access points placed correctly for optimal coverage is absolutely crucial. If you need a hand with the physical side of things, it’s often wise to bring in professional access point installation services to get it right the first time.
Ultimately, a modern network installation hinges on smart authentication. Technologies like IPSK (Identity Pre-Shared Key) and EasyPSK are vital for securing BYOD environments because they give each user or device its own unique key. This approach finally moves us away from insecure, easily-shared passwords and gives you a much higher level of control and visibility—something every organization needs today.
Planning Your Cisco Meraki Network Deployment
Any successful wireless network installation starts long before you ever unbox a single piece of hardware. It all begins with a solid, strategic plan. Honestly, this upfront thinking is the most important part of the entire project. It's what saves you from countless headaches down the road and ensures your network just works from day one.
The absolute first thing on your checklist should be a proper site survey. This isn't just a quick walk around the building. It’s a methodical analysis of your physical space, designed to map out coverage zones and identify the perfect spots for your Cisco Meraki access points (APs). Just as critically, it helps you sniff out potential sources of interference—things like thick concrete walls, big metal filing cabinets, or even elevator shafts that can wreak havoc on Wi-Fi signals.
A proper site survey is non-negotiable. I've seen organizations try to save time by skipping this step, only to end up with frustrating dead zones and unreliable connections that cost far more to fix after the fact.
Getting a Handle on User Density and Hardware Needs
With a map of your physical layout in hand, the next step is to figure out who will be using the network and what they'll be doing. We call this calculating user density, and it’s a game-changer for hardware selection. The demands of a university lecture hall, crammed with hundreds of students streaming video at once, are a world away from a small retail shop where the network just needs to support a couple of POS systems and some casual guest browsing.
This analysis is what tells you exactly which Meraki APs to buy. They aren't all built the same, and picking the right tool for the job is essential.
- For High-Density Education Environments: In places like auditoriums or student unions, you need an AP specifically designed to handle a massive number of simultaneous connections without batting an eye.
- For Seamless Retail Operations: Here, it’s all about reliable coverage. The network has to keep payment terminals and inventory scanners online while also providing a smooth guest experience through a Captive Portal.
- For Secure Corporate BYOD: In an office where everyone brings their own laptop, phone, and tablet, the focus is on security and capacity. The network must juggle video calls, cloud apps, and emails, all secured with advanced Authentication Solutions like IPSK.
Choosing the right model makes all the difference. A good plan means you invest in exactly what you need—no more, no less. You avoid overspending on features you'll never use or, even worse, underspending and getting stuck with a network that can't keep up. To really nail this, check out this in-depth guide on how to conduct a site survey for a wireless network.
Thinking About the Full Lifecycle
A truly comprehensive plan also accounts for your existing infrastructure. If you're upgrading an older system, especially in a data center, you need a strategy for the old gear. For a secure and compliant removal, using professional data center decommissioning services is often the smartest move to handle the process correctly.
This initial planning phase is your blueprint for everything to come. You’ll decide on network segmentation—like creating separate networks for staff, guests, and IoT devices. You'll also start sketching out the user journey. How will people actually get online? This is where you begin designing your Captive Portals and mapping out your Authentication Solutions, such as using EasyPSK to make onboarding employee devices a breeze.
By thoroughly mapping coverage, calculating user density, and selecting the right Cisco hardware, you’re doing more than just installing Wi-Fi. You’re building a reliable and secure digital foundation for your entire organization.
Installing Hardware and Connecting to the Meraki Cloud
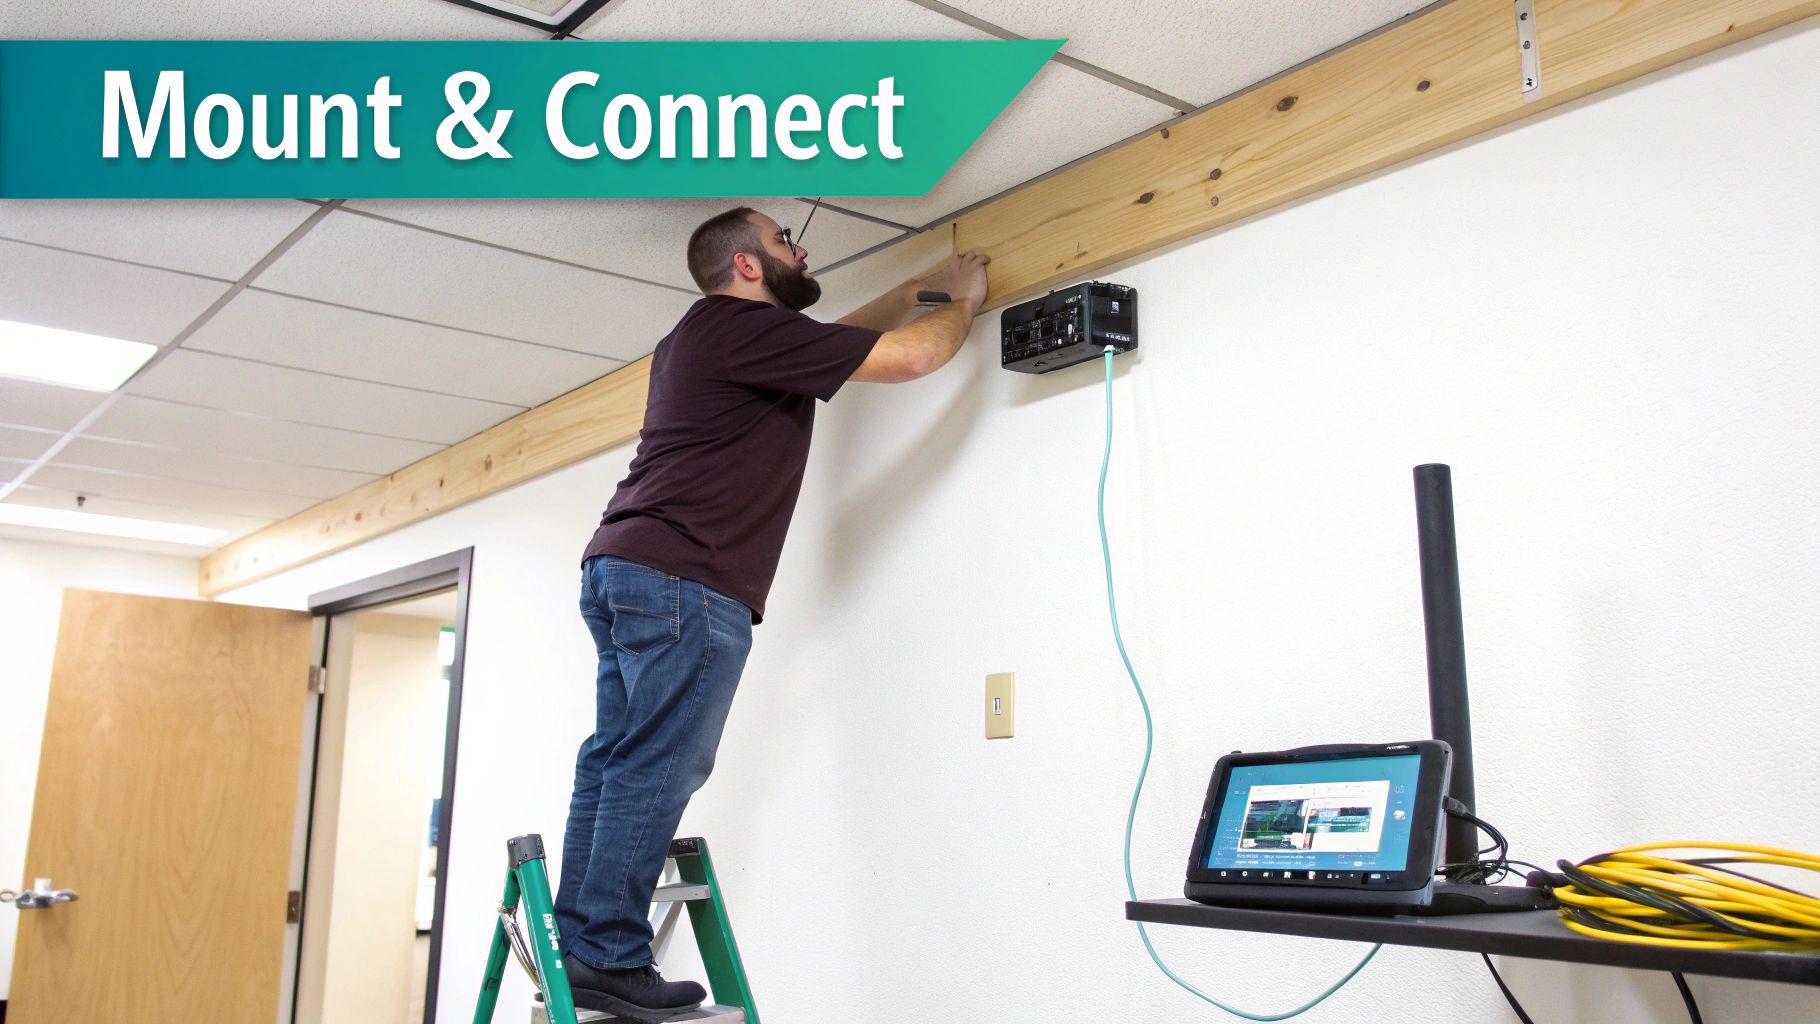
Now that you've got a solid plan, it's time to get your hands dirty and bring this network to life. This is where the blueprints and diagrams become a real, working system. The physical installation of your Cisco Meraki access points (APs) is more than just screwing them into the ceiling; placement is everything. Even the best hardware will underperform if it's stuck in a bad spot.
Think of your AP's signal like light from a bare bulb. You want to mount it high and central—usually on the ceiling—to cast the widest possible net of coverage. Avoid the common mistakes of tucking APs into closets, behind metal filing cabinets, or above HVAC ducting. These are signal killers and will create frustrating dead zones.

Don't skimp on the cabling, either. A high-quality Ethernet run from your switch to each AP forms the network's backbone. And a quick pro-tip: always check your Power over Ethernet (PoE) budget on the switch. The last thing you want is to run out of juice when you still have a few APs left to power up.
Onboarding Your Devices to the Cloud
This is where you'll really start to see the beauty of the Meraki ecosystem. The cloud management platform is a game-changer. Forget SSHing into individual devices or dealing with clunky local controllers. Here, you just "claim" your hardware in the dashboard.
Every Meraki device has a unique serial number, which is all you need to get it online.
- First, log into your Meraki Dashboard—this will be your single pane of glass for everything.
- Head over to the Organization > Inventory section. This is the holding pen for all your gear before you assign it to a network.
- Next, you'll claim the devices. You can punch in the serial numbers manually, but the Meraki mobile app's scanner makes this incredibly fast.
Once a device is claimed and assigned to your network, just plug it into a live internet connection. It automatically phones home to the Meraki cloud, pulls down its configuration, and appears online in your dashboard. It's a remarkably slick process that can take just a couple of minutes.
The first time you plug in a new AP and watch it pop up in the dashboard moments later, you'll get it. This is the power of cloud-managed networking—it turns a job that used to take hours of manual config into a simple, scalable process.
Setting Up Your First Wireless Network
With your hardware online and reporting in, it's time to broadcast your first SSID (the network name your users will see). The Meraki dashboard has an intuitive wizard that walks you through the initial setup, which makes the installation of wireless network software incredibly simple. You’ll create a network name and choose your basic security settings right away.
This first SSID is your foundation. In a corporate office, this might be the primary network you'll later enhance with more advanced Authentication Solutions for employee devices. In a coffee shop or school, this is the network you'll eventually tie to a Captive Portal for guest access.
For example, you might start with a "Staff" network using standard WPA2 security. Down the road, you can easily layer on solutions like IPSK or EasyPSK to issue a unique key to every single employee, which is a massive security upgrade. We'll get deeper into those powerful authentication methods in the next section.
Making the right hardware choice from the start is critical. Understanding the capabilities of different Meraki access points will ensure you have the right tool for the job, whether you're covering a high-density auditorium or a sprawling warehouse.
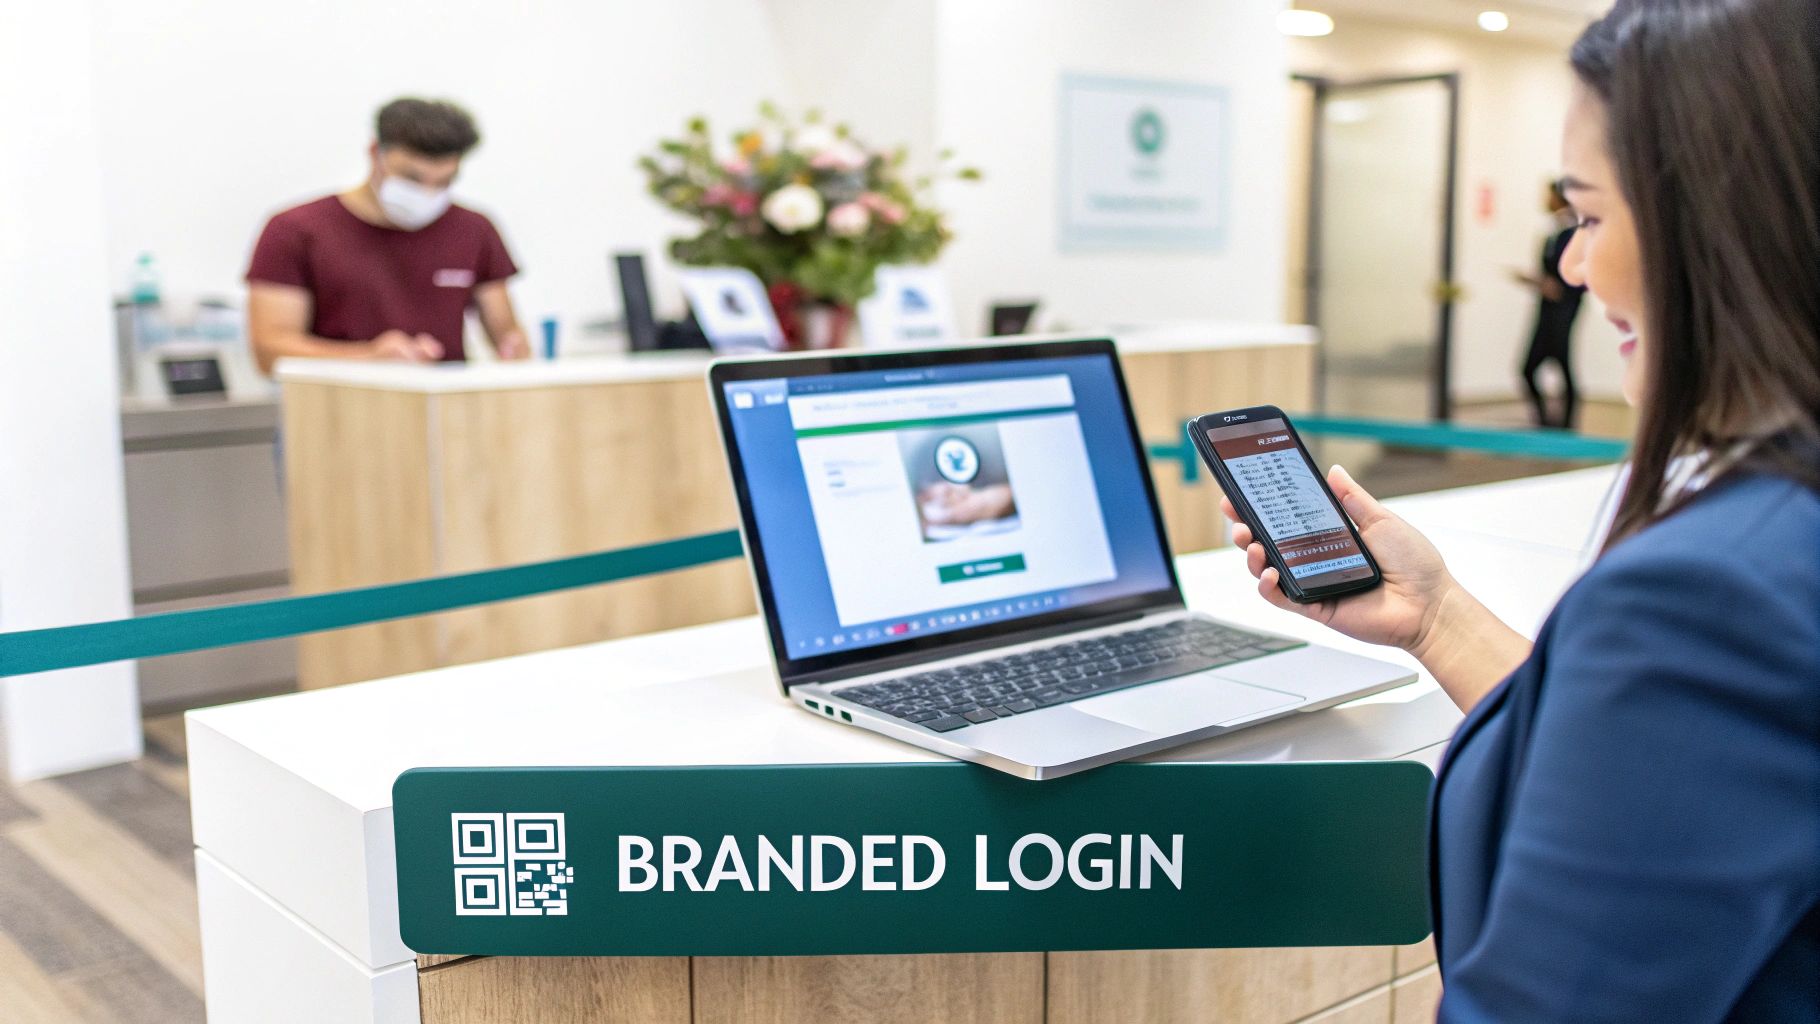
Creating a Secure and Branded User Experience
Once your hardware is up and running, the real fun begins. This is where we move beyond just providing a signal and start building a smart, secure, and branded gateway for everyone who connects. It’s your chance to make a professional first impression while simultaneously locking down your network.
A massive part of this is the Captive Portal. Think of it as the digital front door to your Wi-Fi. For a Retail store, a school in the Education sector, or even a corporate guest network, this portal is often the very first interaction a person has with your brand. By using a tool like Splash Access, which integrates seamlessly with Cisco Meraki, you can design beautiful, on-brand landing pages that are both welcoming and incredibly functional.
This isn't just about a pretty welcome screen; it's a strategic asset. You can use it to display terms and conditions, flash a special offer to shoppers, or gather user info for marketing. If you want some inspiration, check out these excellent Meraki splash page examples to see what’s possible.
Rethinking Authentication for Today's Challenges
Let's be honest, the days of having a single Wi-Fi password for an entire organization are over. Or at least, they should be. In today’s world of Bring Your Own Device (BYOD), that old approach is a glaring security hole. A shared password inevitably gets written on sticky notes, texted to former employees, and becomes a nightmare to manage.
This is where we need to shift our thinking from securing the network to securing the user. This is especially critical in places like Education, Retail, and Corporate BYOD environments where countless personal devices connect every day. The answer is to give every user and every device its own unique key to the network.
Introducing IPSK and EasyPSK
Identity Pre-Shared Key, or IPSK, is a total game-changer for network security. Instead of one password for everyone, IPSK lets you generate a unique credential for each user or device, all while they connect to the same familiar SSID. This gives you an incredible amount of control and visibility.
Think about these real-world scenarios:
- Corporate Office: A new employee starts, and you issue a unique key for their laptop and phone. When they leave the company, you simply revoke their key. No one else is affected, and your network is secured in an instant.
- University Campus: Every student gets their own credential for the dorm Wi-Fi. This immediately stops password sharing and allows the IT team to trace any network abuse directly back to an individual, not just a vague room number.
EasyPSK takes this a step further by dramatically simplifying the management of thousands of these unique keys, making it a truly scalable solution for even the largest organizations.
Tying network access to a specific identity is a fundamental shift in wireless security. It moves you from a reactive, "whodunit" position to a proactive one, where you have granular control over exactly who is on your network at all times.
Setting Up a Secure and Professional Onboarding Flow
When you integrate these advanced Authentication Solutions with a Captive Portal, you create a seamless and highly secure onboarding experience for your users.
Imagine a new employee getting an email with a QR code. They scan it, their device is automatically configured with their unique IPSK, and they're securely on the network. No calls to the helpdesk. No confusing instructions. Just simple, secure access.
This combination of a branded login and individualized security credentials elevates your network from a simple utility to a professional, managed service. It shows a real commitment to security while providing an experience that feels both effortless and safe.
The impact of robust mobile tech like this is huge. These networks don't just connect people; they power economies. In fact, mobile technologies now contribute around 5.8% to the global GDP—that’s about $6.5 trillion in economic value. As wireless capabilities grow, this number will only get bigger, which you can read more about in the GSMA Mobile Economy report. It really drives home how vital a well-executed wireless network is to any modern operation.
Optimizing and Securing Your Meraki Wi-Fi Network
Getting your network live is a huge milestone, but the work isn't quite finished. Now comes the part where we turn a functional network into a truly high-performing, secure asset for your organization. This is where the Cisco Meraki dashboard really shines, giving you all the tools you need to fine-tune every last detail.
Think of it like this: the physical installation was the construction phase. Now, we're moving into active management to guarantee a fast, reliable, and safe experience for every single user.
The first thing you need is a clear picture of what’s actually happening on your network. The Meraki dashboard gives you incredible visibility into client traffic. You can see exactly who is connected, which applications they’re running, and how much bandwidth they're chewing through. In a busy environment like a school campus or a bustling office, this kind of insight is pure gold.
With this data, you can spot potential bottlenecks before they snowball into major headaches. For instance, you might notice a handful of users in one department are hogging an enormous amount of bandwidth, which could be slowing down critical business operations for everyone else.
Shaping Traffic for a Better User Experience
Once you have a handle on the usage patterns, you can start proactively managing your network resources. One of the most powerful tools at your disposal is traffic shaping. By setting bandwidth limits and creating custom rules, you can ensure your network’s performance is aligned with your business priorities. This isn't about being restrictive; it's about being smart.
Let’s say you’re managing a university library during finals week. You can use traffic shaping to give top priority to online research databases and learning management systems while slowing down non-essential, bandwidth-heavy activities like video streaming. This makes sure students have the fast, reliable access they need when it matters most.
This principle applies across all sorts of industries:
- Corporate BYOD: You can prioritize video conferencing tools, ensuring remote and in-office staff always have crystal-clear calls.
- Retail: Guarantee that POS systems and payment terminals have the dedicated bandwidth they need for lightning-fast transactions, even on the busiest shopping days.
- Education: Make sure essential online learning apps and digital textbooks are always responsive for students and faculty.
Strengthening Your Security Posture
A fast network is great, but a secure one is non-negotiable. The Meraki dashboard simplifies the process of layering in powerful security features to protect your network and its users from modern threats.
"A network is only as strong as its weakest link. Proactive security management isn't a 'set it and forget it' task; it's an ongoing commitment to protecting your users and your data."
Right from the dashboard, you can enable features like Advanced Malware Protection (AMP) to scan files for malicious code and Intrusion Detection and Prevention (IDS/IPS) to actively monitor for suspicious activity. These tools work quietly in the background, providing an essential layer of defense against a constantly evolving threat landscape.
This push for custom, secure networks is a major industry trend. The global wireless market has seen a huge spike in private network deployments. As of early 2025, over 1,700 organizations worldwide have deployed private LTE or 5G networks. It's a clear signal that businesses are investing heavily in customized solutions for better control and security. You can find more data on this trend in the Private 4G/LTE and 5G Networks 2025 report.
Maintaining Peak Wireless Health
Long-term success depends on continuous optimization. Your wireless environment is always changing—new devices connect, applications are updated, and user habits shift. Regularly checking in on your network's health helps you stay ahead of potential issues.
By diving into the analytics, you can tweak settings and adjust configurations to keep your network humming. This kind of proactive management ensures your Cisco network remains the reliable, high-speed asset you designed it to be. For a closer look at monitoring performance, check out our guide on introducing wireless health and RF profiles. This ongoing attention is what truly separates a good installation from a great one.
Even after mapping out a detailed plan, questions always come up during a real-world wireless network installation. It's just part of the process. Over the years, we've heard a lot of the same excellent questions from IT managers and business owners knee-deep in their Cisco Meraki deployments.
Let's dive into a few of the most common ones we get, especially when it comes to securing modern networks in demanding places like schools, retail stores, and corporate offices juggling BYOD policies. This should help clear up any final uncertainties about getting the most out of your new infrastructure.
What Exactly Is IPSK, and Why Is It a Game-Changer for BYOD?
This is probably the most important question we field. Think of IPSK (Identity Pre-Shared Key) this way: instead of giving everyone the same master key to the building, you give each person their own unique key. Even though everyone is connecting to the same Wi-Fi network name (SSID), each user or device has its own private password.
This single change is a massive security upgrade for any BYOD environment. Here's why it works so well:
- Real Accountability: You can trace network activity directly back to a specific person or device, not just a generic "Guest" user. This is a lifesaver for troubleshooting and essential for security audits.
- Hassle-Free Revocation: When an employee leaves or a student graduates, you just delete their key. That’s it. You don't have to trigger the chaos of changing the Wi-Fi password for hundreds of other people.
- Serious Security: It completely neutralizes the risk of a single, shared password getting out and compromising the entire network.
For any corporate or education environment, switching to an IPSK model is one of the most impactful security improvements you can make. It solves the single biggest weakness of traditional shared passwords and gives you fine-grained control over who's on your network.
What might sound like a management nightmare is actually simple with the right tools. Platforms like Splash Access can automate creating and managing thousands of these unique keys, making EasyPSK a practical reality for any organization.
How Hard Is It to Actually Set Up a Captive Portal?
Honestly, setting up a Captive Portal with Cisco Meraki is surprisingly straightforward, especially when you use an integrated platform like Splash Access. You absolutely do not need to be a web developer to create a professional, branded login experience for your guests and users.
The process is pretty simple. Inside your Meraki dashboard, you just tell your guest SSID to use an external captive portal. Then, you point it to the URL your portal provider gives you.
All the creative stuff—adding your logo, choosing login methods (like social media, forms, or simple click-through), and displaying your terms—is handled in a simple, visual editor. It’s built to be intuitive, so you can roll out a slick, consistent welcome page across one location or hundreds without breaking a sweat.
What Are the Keys to a Successful Physical AP Installation?
Software is only half the battle. A successful physical installation of wireless network hardware really comes down to nailing three critical things from the get-go. Getting these right will save you a world of hurt from performance headaches and user complaints later on.
- Placement Is Everything: Your site survey is your roadmap. Mount access points in central locations—ideally on the ceiling—for the best signal coverage. You have to be mindful of obstructions like thick concrete walls, large metal file cabinets, and sources of radio frequency interference (think microwaves or heavy machinery).
- Don't Skimp on Cabling: I can't stress this enough: use good cable. High-quality Ethernet cabling (Cat6 or better) is non-negotiable for a stable, high-speed connection between your APs and the switch. A cheap or faulty cable is one of the most common—and most frustrating—causes of network instability.
- Check Your PoE Budget: Before you plug anything in, double-check that your Power over Ethernet (PoE) switch can actually supply enough wattage for all the Meraki APs you're connecting. Running out of power budget is a simple mistake that can bring your entire installation to a dead stop.
Ready to create a seamless, secure, and branded Wi-Fi experience? Splash Access integrates directly with your Cisco Meraki hardware to provide powerful Captive Portals and advanced authentication solutions like IPSK.
Discover how Splash Access can transform your network today!


