So, you're looking to configure an access point for your network? Welcome to the club! It's a whole different ball game these days. Gone are the days of just plugging it in and hoping for the best, especially with the explosion of personal devices everyone brings with them into corporate, retail, and education spaces.
Your Guide to Modern Wi-Fi Network Setup
Learning how to properly set up a wireless access point is now a fundamental skill for anyone in charge of a network. This isn't a "set it and forget it" task anymore. From bustling retail shops and corporate offices embracing BYOD to sprawling university campuses, every environment needs a smarter approach to Wi-Fi. The aim is to deliver seamless, secure access that actually improves the user experience, rather than getting in the way.
The sheer number of devices connecting to our networks is what’s driving this change. The global wireless access point market was valued at around USD 5.5 billion back in 2022 and is projected to hit nearly USD 28.9 billion by 2030. That’s a massive jump, and it shows just how dependent we've become on reliable wireless connectivity.
Focusing on Smart and Secure Connections
Modern setups are about much more than a simple password. We're now building tailored, secure experiences for different types of users on the same network. This guide will walk you through configuring a Cisco Meraki access point, a favorite in the industry for its cloud-based management and robust feature set.
We'll focus on practical solutions that deliver real value, like:
- Captive Portals: Think of those branded login pages you see at coffee shops or airports. They're perfect for engaging customers in a retail store or outlining acceptable use policies in a school.
- Advanced Authentication Solutions: Technologies such as IPSK (Identity Pre-Shared Key) and EasyPSK are game-changers for managing BYOD environments. Instead of one password for everyone (a huge security risk), each user gets a unique key. This drastically boosts security without making things complicated for users or IT.
The real art of configuring an access point today lies in balancing robust security with a frictionless user experience. You need a network that is both a fortress and a welcome mat.
At a high level, the goals for configuring an access point can vary quite a bit depending on the environment you're working in.
Key Configuration Goals at a Glance
This table summarizes the core objectives when configuring an access point in different environments, highlighting the primary focus for each sector.
| Sector | Primary Goal | Key Technology Focus |
|---|---|---|
| Retail | Customer Engagement & Data Analytics | Branded Captive Portals, Social Logins, Location Analytics |
| Corporate | Secure BYOD & Employee Access | Identity PSK (IPSK), 802.1X, Network Segmentation |
| Education | Device Management & Content Filtering | EasyPSK for student devices, Role-Based Access Control |
| Hospitality | Seamless Guest Experience & Tiered Access | Vouchers, Paid Access Tiers, PMS Integration |
Understanding these different goals helps you make smarter decisions during the setup process, ensuring the final configuration meets the specific needs of the organization.
Ultimately, a well-configured network should feel invisible to the people using it—it just works. Whether you're managing Wi-Fi for students, shoppers, or employees, the core principles of building a stable, secure, and intelligent network are the same. Before we jump into the technical steps, it helps to have a solid grasp of what these devices do. For a refresher, check out our guide on what are access points.
Getting Your Cisco Meraki Access Point Online
Before we can even think about cool splash pages or advanced security setups, we have to get the fundamentals right. This all starts with something surprisingly low-tech but critically important: physical placement. Where you put your access point has a massive impact on performance.
Think about the real-world space. A bustling retail store needs solid coverage from the front counter to the back stockroom. An education setting, like a school, has to eliminate dead zones in every classroom and lecture hall so a dropped connection never disrupts a lesson. Spending an extra ten minutes walking the floor and planning placement will save you a world of headaches down the line.
Connecting to the Meraki Cloud
Once you’ve found the ideal spot and plugged in your AP, the next move is to get it talking to the Cisco Meraki dashboard. This is where cloud management really proves its worth. The first thing you'll do is "claim" the device by punching in its serial number, which instantly ties it to your account.
From there, you’ll assign the access point to one of your pre-configured networks. This is a crucial step—it's what tells the device which SSIDs, security rules, and other settings to automatically pull down from the cloud. I always make it a habit to check for firmware updates right away. Meraki is constantly rolling out improvements, and you want your hardware running the latest and greatest for stability and security from day one.
The image below breaks down the key factors to consider when you're planning an AP deployment, connecting your coverage needs with the device's capacity.
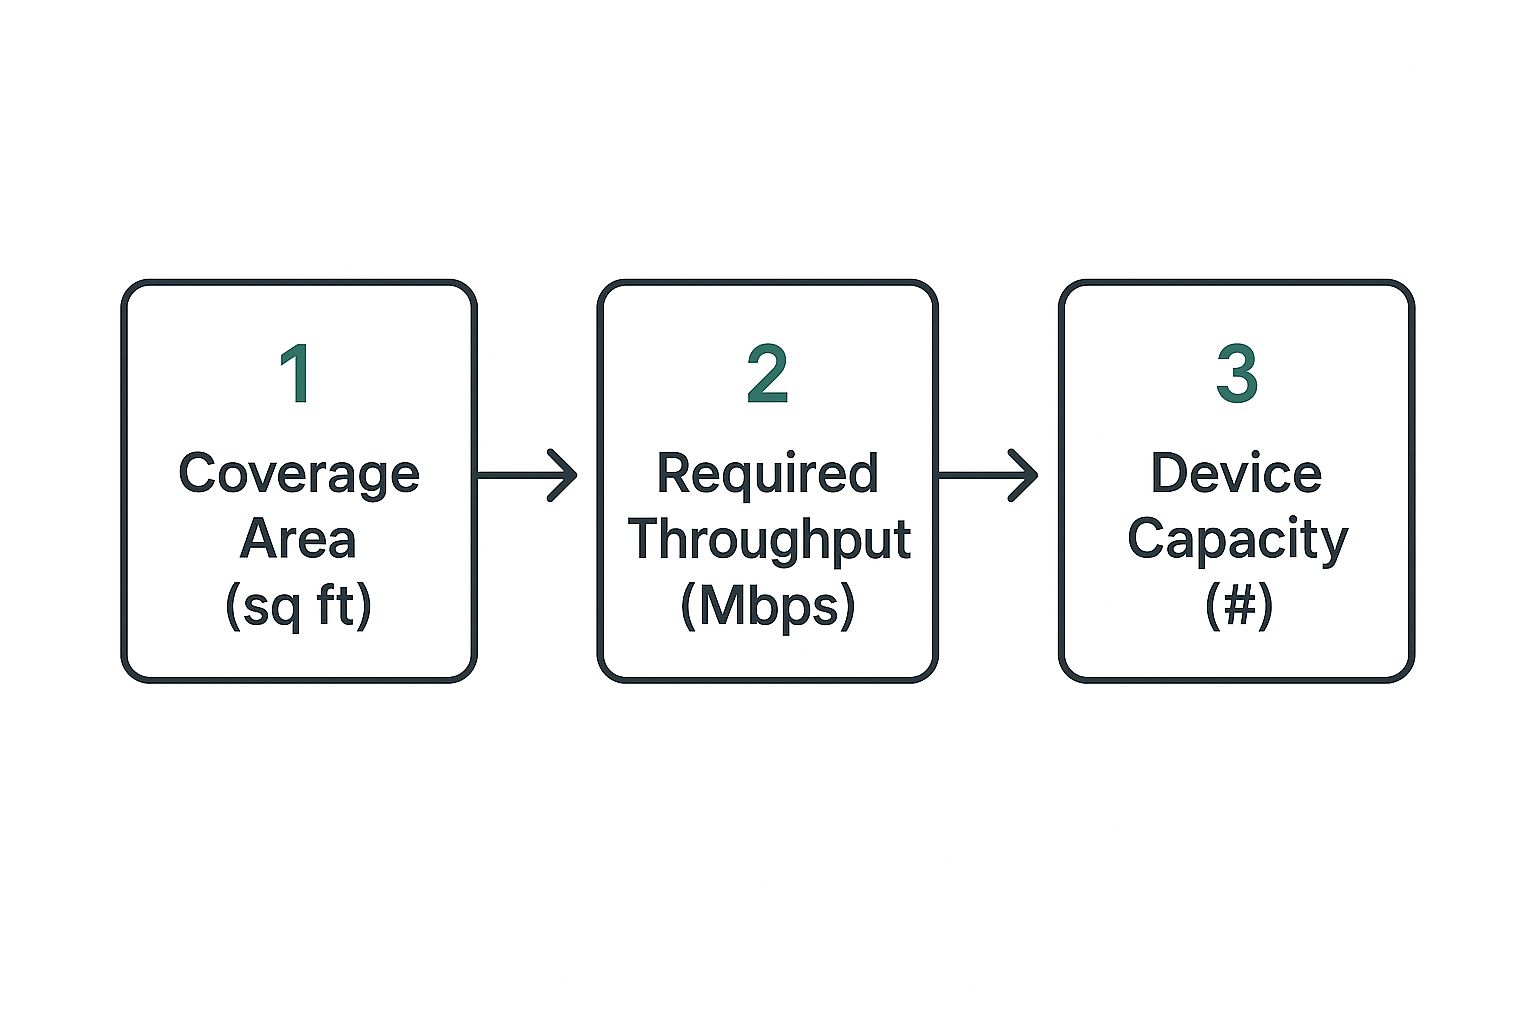
As you can see, the process flows from the physical (your coverage area) to the technical (how many people and what kind of speeds you need), which helps you make sure you've got the right tool for the job.
Licensing and First Steps
Here’s a step that’s absolutely non-negotiable: making sure your device is properly licensed. A Cisco Meraki access point is essentially a paperweight without a valid license. The license is what unlocks access to the cloud controller and all its powerful features.
Getting the initial hardware setup and cloud connection right is the bedrock for everything else. All your advanced configurations—from captive portals to complex security policies—are built on this foundation.
Once your AP is claimed and licensed, it’ll pop up in your dashboard, ready to go. You’ve now confirmed it's installed correctly, fully updated, and communicating with the mothership. To get a better handle on this, it's worth exploring the details of Meraki subscription licensing and how it affects your network operations.
With your access point officially online, you're ready for the fun part: building the secure, user-friendly wireless networks your organization depends on.
Setting Up Secure SSIDs for Different User Groups
Now that your Cisco Meraki hardware is online and talking to the cloud, it's time to build the actual wireless networks (SSIDs) people will connect to. This goes way beyond just picking a catchy Wi-Fi name. A smart strategy, and one I always recommend, is to create separate SSIDs for different types of users. This is a foundational practice for security and manageability in any busy place, from an education campus to a retail shop or a corporate office juggling BYOD traffic.

A good starting point is to set up a few distinct networks. You'll almost always want one for staff, a separate guest network for visitors, and maybe even a third dedicated to IoT devices like security cameras or smart displays. This segmentation is your first and most important line of defense—it keeps a visitor on the guest network from ever stumbling into your sensitive internal files.
Don't Settle for Outdated Security Protocols
When you're configuring an access point, choosing the right security protocol is absolutely critical. We've come a long way from the old days of basic WEP encryption. After its vulnerabilities were exposed, the industry moved to WPA2, and now WPA3 is the standard you should be aiming for. This evolution shows a huge shift toward better cybersecurity, especially as major markets push for stronger data protection.
Simply put, WPA3 provides much more robust protection against password-guessing attacks. It also ensures that even if a password was somehow compromised, all past traffic remains encrypted and unreadable. For any new network you set up today, WPA3 should be your default choice. You can dive deeper into the technical details in our article explaining what is WPA3.
The Power of Individual Passwords with IPSK
Let’s talk about a real game-changer, especially for education and corporate sectors managing a ton of personal devices: Identity Pre-Shared Keys (IPSK). The old method of handing out a single Wi-Fi password to everyone is a security nightmare. One person leaves the company, and suddenly you have to change the password for the entire organization and deal with the chaos of redistributing it.
IPSK, and even simpler solutions like EasyPSK, completely flip that model on its head. Instead of one password for everyone, each user or device gets its own unique key.
Think about it: you can give every student, employee, or even a specific printer its own personal Wi-Fi password. If a device is lost or an employee moves on, you just revoke that single key without affecting anyone else.
This approach brings enterprise-grade security down to a practical level without all the usual complexity. It’s the perfect way to manage a large number of devices while keeping a tight grip on who can access what.
Here’s how this plays out in the real world:
- For Education: You can assign a unique key to each student that's valid for the entire school year. This makes it incredibly simple for them to connect their laptops and tablets, while also giving you a clear way to track usage and revoke access if a student misuses the network.
- For Corporate BYOD: In a BYOD environment, IPSK is fantastic. It ensures only authorized employee devices can get onto the secure internal network. Better yet, you can tie access directly to an individual's identity, giving you incredibly granular control.
- For Retail: Even retail stores can use IPSK for staff devices, point-of-sale terminals, and inventory scanners. This creates a highly secure, isolated network that's completely separate from the public guest Wi-Fi.
By layering these strategies—segmented SSIDs, modern WPA3 security, and the fine-grained control of IPSK—you build a wireless network that's not just easy for people to use, but also incredibly secure.
Building an Engaging Captive Portal Experience
That first moment a visitor connects to your guest Wi-Fi is their first digital handshake with you. Why make it a forgettable one? A Captive Portal is so much more than a simple login page; it's your digital welcome mat. When you configure your Cisco Meraki access point with a platform like Splash Access, you transform that initial connection into a powerful engagement opportunity.
This is where your Cisco Meraki AP really comes into its own. By pairing it with a dedicated captive portal solution, you’re no longer just providing a basic internet connection—you’re crafting a bespoke user experience. The goal is to make the login process valuable for everyone involved, not just a hurdle to jump over.
Tailoring the Experience for Your Audience
The real magic happens when you customize the portal to fit your specific environment. A one-size-fits-all approach is a recipe for a bland, ineffective experience.
Think about a retail setting. Your captive portal can become a direct line to your customers. Imagine a shopper connects to your Wi-Fi and is instantly greeted with:
- A quick video showcasing a new product line.
- A digital coupon for 10% off their purchase, sent right to their device.
- A prompt to follow your brand on social media for free, high-speed internet.
Now, pivot to an education environment, where the needs are completely different. A university can use its portal to broadcast campus news, post upcoming event schedules, or display critical acceptable use policies that students must agree to before getting online. It effectively becomes a central communication hub.
For a corporate guest network supporting a BYOD setup, the portal should be clean, professional, and on-brand. A simple login page featuring your company logo reinforces your corporate identity and provides a secure, controlled entry point for visitors without any unnecessary friction.
A well-designed captive portal doesn't just grant access; it adds value. It turns a utility into an interactive experience that can inform, persuade, and engage your users from the moment they connect.
Bringing Your Portal to Life with Authentication Solutions
The next layer is choosing the right authentication solutions. This is how users verify their identity, and it’s another chance to collect valuable information—with their permission, of course. You can go far beyond a simple click-to-connect button and implement more dynamic methods.
Popular options include social logins (Facebook, Google), email capture forms, or even voucher codes for timed access. Each method brings something different to the table, whether it’s building your marketing list or offering tiered access levels.
For a deeper look at making these portals work for you, our guide to Wi-Fi captive portals offers a ton of great insights. While security protocols like IPSK and EasyPSK are fantastic for securing internal networks, the captive portal is your gateway to engaging guests and visitors.
The strategic value of a captive portal becomes crystal clear when you see how its features can be adapted across different industries. A feature that's a game-changer in retail might be completely out of place in a corporate setting.
Captive Portal Features for Different Sectors
| Feature | Education Application | Retail Application | Corporate BYOD/Guest Application |
|---|---|---|---|
| Social Login | Not typically used; focus is on student credentials. | Gathers demographic data and enables social marketing. | Simple email or sponsor-approved access is preferred. |
| Video Ads | Can be used for campus announcements or event promos. | Perfect for showcasing new arrivals or current sales. | Generally avoided to maintain a professional experience. |
| Data Capture | Used to log student access and ensure policy compliance. | Builds email marketing lists and customer profiles. | Logs visitor details for security and tracking purposes. |
| Branding | Reinforces school spirit with university logos and colors. | Strengthens brand identity and promotes loyalty programs. | Presents a professional image with corporate branding. |
By carefully considering these options, you can design a splash page that aligns perfectly with your strategic goals. You'll be turning a technical step in your AP configuration into a genuine business asset.
Fine-Tuning Your Network for Peak Performance
So, your access points are online and the security is locked down. That’s a great start, but it’s not the finish line. A truly excellent Wi-Fi experience needs to be fast and stable for everyone, all the time. This is where we shift from a network that just works to one that performs brilliantly, even when it’s under serious strain.

Let's begin with managing the airwaves themselves. Inside the Cisco Meraki dashboard, you have some incredibly powerful tools for channel planning and power settings. Think of these as your secret weapons against interference—the silent killer of good Wi-Fi. When too many APs are bunched together and broadcasting on the same channel, they essentially start shouting over each other, causing slow speeds and frustrating dropped connections for your users.
Trusting Auto RF and Knowing When to Step In
For most setups, Meraki’s Auto RF feature is your best friend. It’s smart enough to analyze the surrounding wireless environment and make real-time adjustments to channels and power levels to keep things running smoothly. In a typical office or a small retail space, you can usually just let Auto RF handle everything. It does a fantastic job.
But what about those really challenging environments? I'm talking about a packed university lecture hall, a sprawling shopping mall on a Saturday, or a busy conference center. In these high-density scenarios, a bit of manual intervention can make a world of difference. You might find it necessary to lock certain APs to specific, non-overlapping channels and dial back their power output. This creates smaller, more concentrated coverage cells, which stops the APs from interfering with one another and forces devices to connect to the closest, strongest signal.
For a deeper dive, you can learn more about how Auto RF works under the hood.
Proactively managing your channels is one of the most impactful things you can do. From my experience, strategic channel assignment can boost wireless throughput by up to 30% over just sticking with the default settings.
Properly configuring your AP power levels and even their physical antenna orientation is also key to wiping out those annoying dead zones. This is non-negotiable in public venues where people expect perfect coverage everywhere.
Prioritizing Your Most Important Traffic
Another game-changing tool you have is traffic shaping. Let's be honest, not all data is created equal. A real-time video call is far more sensitive to lag than an employee downloading a large file in the background. Traffic shaping lets you put your most critical applications at the front of the line.
Here’s how this plays out in the real world:
- Corporate Office: You can create a rule to give priority bandwidth to apps like Zoom or Microsoft Teams. This ensures your meetings are always crystal clear, no matter what else is happening on the network.
- Education: In a school, you could prioritize traffic to online learning platforms or specific educational apps, guaranteeing students have the access they need without interruption.
- Retail: Prioritizing point-of-sale (POS) systems is a must. It ensures customer transactions are processed instantly and reliably, which is critical for business operations.
On top of that, it’s always a good idea to set some bandwidth limits, especially on the guest network. This is a simple but effective way to prevent a handful of users from hogging all the bandwidth by streaming 4K video, which would ruin the experience for everyone else. By applying these fine-tuning techniques, you move from just fixing problems to proactively engineering a consistently great network.
Got Questions? We’ve Got Answers on AP Configuration
No matter how carefully you plan a network rollout, questions always pop up. Having worked with everyone from education and retail sectors to large corporate BYOD environments, we’ve seen it all, especially when it comes to setting up Cisco Meraki gear. Here are a few of the most common head-scratchers we run into.
Can't I Just Use One SSID for Everything?
Technically, you could. But you absolutely shouldn't. It's a huge security risk and just plain bad practice.
Creating separate SSIDs for different user groups—like staff, guests, and maybe even IoT devices—is a cornerstone of good network design. This concept, known as network segmentation, ensures that a security hiccup on your guest network can't spread to your critical internal systems. It's the digital equivalent of having separate keys for your front door and the server room.
What's the Big Deal with IPSK vs. a Regular Wi-Fi Password?
A standard Wi-Fi password is a Pre-Shared Key (PSK). It’s one password for everyone. When someone leaves the company or a device gets stolen, you’re stuck changing the password for every single person and device. It's a massive headache.
IPSK, or Identity Pre-Shared Key, flips the script by giving each user or device its own unique key. With tools like EasyPSK, managing this is surprisingly simple.
- An employee leaves? Deactivate their key.
- A student's laptop is lost? Disable its key.
- Need to track device usage? You can see who is connected with which key.
This approach is worlds more secure and manageable for any organization that has more than a handful of users.
The real power of IPSK is individual accountability. You gain precise control and visibility, something a single shared password can never offer.
Why Isn't My Captive Portal Popping Up?
Ah, the classic "where's my splash page?" problem. More often than not, the culprit is the device's DNS settings.
If a user has manually set their device to use a public DNS server (like Google's 8.8.8.8), it can sidestep the network redirect that's supposed to pull up your Captive Portal.
Another common issue is a device that has "remembered" the network from a past session. The session has expired on your end, but the device thinks it's still connected. The quickest fix is to have the user "forget" the network and reconnect. And of course, always double-check that your Cisco Meraki AP is properly pointing all guest traffic to your splash page URL first.
Ready to build a smarter, more engaging Wi-Fi network? Splash Access provides everything you need to create secure, branded captive portals with advanced authentication solutions like IPSK, perfectly integrated with your Cisco Meraki hardware. Find out more about what Splash Access can do for you.


