Hey there! Thinking about setting up a RADIUS server? You're taking the first real step toward building a Wi-Fi network that's not just secure, but also smart and centrally managed. In a nutshell, you're creating a central gatekeeper that handles all the heavy lifting for authentication, authorization, and accounting (AAA) requests from your network gear, like your awesome Cisco Meraki access points. This server is the bouncer that checks everyone's credentials at the door and decides whether to let them onto your network.
Why RADIUS Is Still the Gold Standard for Secure Wi-Fi
If you've ever managed Wi-Fi for a busy school in the Education sector, a bustling Retail store, or a corporate office with a BYOD policy, you know that security is absolutely non-negotiable. This is where a RADIUS server truly proves its worth. It’s the industry standard for a reason, acting as the definitive security guard for your network by verifying every single user before they get access.
We’re going to walk you through how this amazing technology underpins everything from rock-solid WPA2-Enterprise security for corporate environments to the slick, modern guest Wi-Fi experiences customers now expect. Setting up a RADIUS server isn't just a tech chore; it's the foundation for a secure and manageable network, especially when you pair it with a powerful platform like Cisco Meraki. You can learn more about how a RADIUS server for Wi-Fi can completely transform your network security.
Unlocking Advanced Wi-Fi Experiences
The real power of RADIUS becomes crystal clear when you integrate it with modern authentication solutions. This combination opens up a world of possibilities for different environments:
- Education: You can create distinct access policies for students and faculty, ensuring everyone has a secure connection while keeping sensitive network resources properly firewalled off.
- Retail: It's perfect for implementing engaging guest Wi-Fi with social login options. This gives shoppers easy access and provides you with valuable marketing insights through social Wi-Fi.
- Corporate BYOD: Securely onboard employee devices with advanced methods like IPSK (Individual Pre-Shared Keys) or EasyPSK. Instead of one shared password that can be easily compromised, each user gets their own unique key.
The core benefit here is centralized authentication. You eliminate the nightmare of managing hundreds of individual passwords scattered across devices and gain a single point of control. This makes enforcing security policies and tracking network activity infinitely easier.
Choosing Your RADIUS Authentication Method
Not all authentication methods are created equal. The protocol you choose depends entirely on your security requirements and the types of devices connecting to your network. Here’s a quick rundown to help you decide.
| Authentication Method | Best For | Use Case Example |
|---|---|---|
| WPA2/WPA3-Enterprise | Corporate environments needing the highest level of security. | Employees connecting laptops and phones using unique domain credentials. |
| Individual PSK (IPSK) | BYOD scenarios and IoT devices where individual credentials aren't feasible. | Assigning a unique, revocable key to each employee's personal device. |
| MAC-based Authentication | Headless devices that don't support 802.1X, like printers or scanners. | Automatically connecting a known printer to the network without user interaction. |
| Captive Portal / Social Login | Guest networks in public venues like cafes, hotels, and retail stores. | A customer logging into the guest Wi-Fi using their Facebook or Google account. |
Ultimately, the best choice is the one that aligns with your specific use case, balancing security needs with user convenience.
The Power of Centralized Control
The way we configure RADIUS servers has evolved alongside the explosive growth of data centers, which are the engines powering guest Wi-Fi platforms in corporate offices and co-working spaces. The server market itself is on a massive trajectory, forecasted to hit USD 1,027.83 billion by 2033, largely driven by smartphone adoption and the relentless demand for data centers.
Since its standardization back in 2000, RADIUS has become ubiquitous; over 90% of enterprise WLANs rely on it. For good reason—centralized authentication can slash deployment times by as much as 70% compared to older, decentralized methods. This shift just goes to show how critical a well-configured RADIUS server is for any modern, secure network.
Laying the Groundwork for Your RADIUS Deployment
Before you even touch a RADIUS server configuration file, the real secret to a smooth, headache-free deployment is taking a moment to plan. A bit of prep work up front ensures your network infrastructure, user policies, and authentication goals are all aligned from the get-go.

Think of it like building a house—you need a solid blueprint before you start laying bricks. Your Cisco Meraki access points are capable of handling sophisticated authentication, but they need crystal-clear instructions on how to treat different users and devices.
Defining Your Access Policies
First things first, you need to map out exactly who needs access to your network and what they should be able to do once they're connected. This is especially critical in environments with diverse user groups. For instance, a university in the Education sector has wildly different requirements than a Retail store.
Let's look at a few common scenarios:
- Corporate BYOD: Employees bringing their own devices need secure, seamless access to internal resources. This is a classic use case for robust authentication solutions like WPA2-Enterprise or newer, more flexible methods like IPSK (which you might also see called EasyPSK).
- Guest Wi-Fi: Shoppers in a store or visitors in a lobby need fast, simple access. Here, captive portals with social login options are perfect. They provide a great user experience and can be a fantastic tool for marketing.
- Students & Staff: In a school setting, segmentation is key. You'll likely want to give students filtered internet access while ensuring faculty can get to sensitive administrative systems.
A crucial part of this planning phase is mapping out your network segmentation. Proper VLAN setup is non-negotiable for securely separating different user groups, like corporate staff and guest Wi-Fi users.
If you need a refresher, our guide on setting up VLANs is a great resource to make sure your network is properly structured. Getting this right from the start prevents security gaps and ensures traffic flows only where it's supposed to.
Structuring Your User Database
Once your policies are defined, the next big question is: where will all the user credentials live? Your RADIUS server needs an authoritative source to check against when a user tries to connect.
You have a few solid options, and the right one depends entirely on your environment.
In a corporate setting, you’ll almost certainly want to sync with an existing directory like Azure AD. This lets employees use the same familiar credentials they use for everything else. On the other hand, a retail space providing social Wi-Fi will lean on an external platform to handle social login authentications through its captive portal.
For a small office or maybe just a specific set of managed devices (like IoT sensors or printers), a simple, locally managed list of usernames and passwords right on the RADIUS server might be all you need. Deciding on this database structure now will make the actual server configuration a whole lot easier down the road.
A Practical Guide to Configuring Your RADIUS Server
Ready to roll up your sleeves? Now we get to the hands-on part—actually configuring a RADIUS server. Whether you're in a corporate, retail, or education setting, getting this right is the key to unlocking powerful, secure authentication for your network.
We'll focus on two of the most common platforms you'll run into: Microsoft NPS (Network Policy Server), a staple in Windows-based environments, and the ever-reliable open-source hero, FreeRADIUS. The core concepts are surprisingly similar across both, so let's dive in.
The Core Components of RADIUS Configuration
No matter which server software you choose, the whole process really boils down to a few key tasks. Think of these as the essential building blocks for your authentication system.
You’ll always need to define:
- RADIUS Clients: This is a common point of confusion. The "clients" here aren't the end-user laptops or phones. In our world, the clients are your network access points—the Cisco and Meraki APs that will be forwarding authentication requests to the server.
- Connection Request Policies: These are the initial gatekeepers. They tell the server how to handle an incoming request before it even bothers looking at user credentials.
- Network Policies: This is where the magic happens. These are the rules that determine who can connect, which authentication methods they have to use (like WPA2-Enterprise), and what kind of access they get once they’re authenticated.
The single most common point of failure I see is unbelievably simple: a mismatched shared secret. This is just a password that your RADIUS server and your Meraki APs use to encrypt their communication. It absolutely must be identical on both ends, or nothing will work.
Setting Up a Microsoft NPS Server
For organizations already deep in the Windows Server ecosystem, Microsoft NPS is often the path of least resistance. It integrates directly with Active Directory, making it a natural fit for corporate BYOD policies where you want employees to use their existing domain logins.
Here’s a look at the main console where you'll be spending your time managing policies and clients.
This dashboard is your central hub. From here, you can create fine-grained network policies that grant access based on Active Directory user groups, time of day, or other specific conditions.
Once you have the NPS role installed on your server, your first job is to add your Cisco Meraki access points as RADIUS Clients. After that, you'll create a network policy. In that policy, you'll specify the conditions a user must meet (for instance, being a member of the "Corporate Staff" security group) and the required authentication method. For a deeper look at this protocol, check out our guide on 802.1X authentication.
Configuring FreeRADIUS for Maximum Flexibility
If you prefer open-source or need more customization than NPS offers, FreeRADIUS is the industry powerhouse. It's incredibly versatile and can be configured to talk to almost any database or directory you can think of. This makes it perfect for more complex environments like universities or large retail chains needing flexible guest Wi-Fi solutions and captive portals.
While it lacks a fancy graphical interface out of the box, its configuration is managed through a handful of straightforward text files. You'll mainly be working with:
clients.conf: This is where you define your Meraki APs and, critically, set their shared secrets.users: A simple file for managing local user accounts, which is perfect for initial testing or very small-scale deployments.eap.conf: Here you’ll configure the nuts and bolts of your authentication methods, like PEAP or EAP-TTLS.
The impact of a well-configured RADIUS setup is felt globally, especially in the Education and Retail sectors. This ties directly into the massive growth of the server market, which was valued at USD 89.91 billion in 2021 and is projected to hit USD 131.50 billion by 2026.
Since its release in 2000, FreeRADIUS has become the world's most popular open-source RADIUS server, powering a staggering 80% of these deployments and handling billions of authentications daily. These numbers really drive home how foundational this technology is to modern network infrastructure. You can read more about the global server market's impressive growth in this market review.
Tying It All Together: RADIUS, Cisco Meraki, and Your Captive Portal
Alright, with your RADIUS server configured, it's time for the real fun: connecting it to your Cisco Meraki dashboard. This is where the magic happens, turning all that backend setup into powerful, real-world authentication solutions that can completely reshape your Wi-Fi experience.
Whether you're running a Retail shop, a school campus, or a corporate office juggling a BYOD policy, this integration is the key. You're about to create secure, segmented, and intelligent network access that goes far beyond a simple shared password.
The core of the process is pointing your Meraki SSIDs to your RADIUS server. From that moment on, your RADIUS server becomes the gatekeeper for every connection request.
This diagram breaks down that fundamental authentication flow—from a device trying to connect to the final policy enforcement.
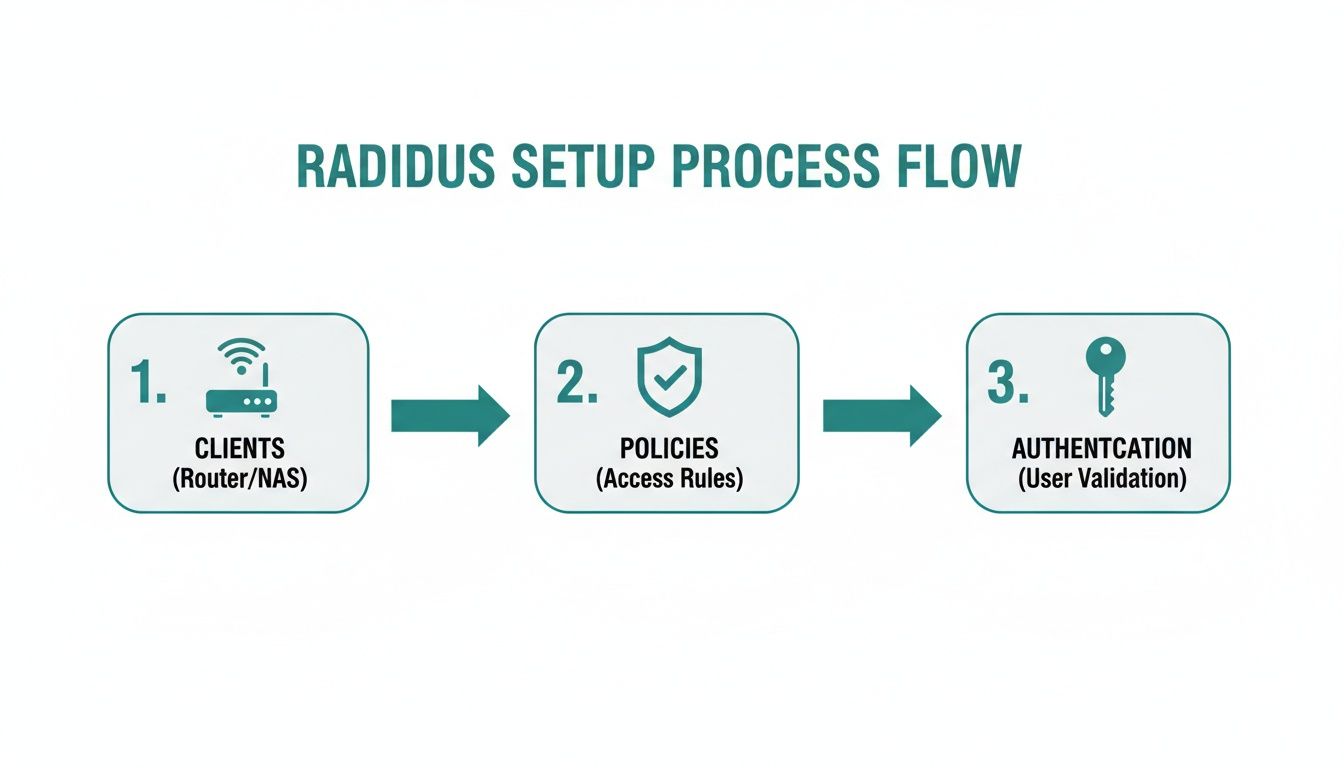
As you can see, the access point is just the middleman. It passes credentials over to the RADIUS server, which does the heavy lifting of checking policies and deciding whether to grant or deny access.
Bringing Your Captive Portal to Life
One of the most immediate and visible wins from this setup is deploying a dynamic captive portal. For a retail environment, this is a genuine game-changer. Instead of just giving away free Wi-Fi, you can now present guests with a branded landing page offering a variety of login options.
- Social Wi-Fi: Let customers connect using their social media accounts. It’s a frictionless experience for them and provides valuable (and anonymized) demographic insights for your business.
- Voucher Access: Perfect for hotels or conference centers. You can generate unique access codes for guests that are valid for a specific duration.
- Paid Access: Need to monetize your network? Set up a billing gateway directly through the portal and turn your Wi-Fi into a revenue stream.
On the backend, your captive portal is constantly talking to the RADIUS server to authenticate users based on how they choose to log in. This not only creates a secure, controlled guest Wi-Fi environment but also doubles as a powerful marketing and engagement tool.
Advanced Authentication for Secure BYOD
In corporate and education settings, the primary goal is often securing employee and student devices without burying the IT team in support tickets. This is where methods like IPSK (Identity Pre-Shared Key), which you might also see called EasyPSK, really shine.
Instead of a single, easily leaked password for the whole organization, each user or device gets a unique key.
Pro Tip: With IPSK, when an employee leaves or a student graduates, you just revoke their individual key. Nobody else is affected. This makes network offboarding incredibly efficient and airtight from a security standpoint.
This same RADIUS integration is what powers WPA2-Enterprise. It allows users to connect using their existing directory credentials, like their Azure AD or G Suite logins. This alignment streamlines the onboarding process and ensures your security policies are applied consistently everywhere.
A Look at Different Meraki Authentication Setups
Meraki’s dashboard makes it pretty simple to choose the right authentication type for your SSID. It all comes down to aligning the setting with what you’ve configured on your RADIUS server.
Here's a quick breakdown of the most common options and where they fit best.
Cisco Meraki Authentication Options with RADIUS
| Meraki Setting | What It Does | Ideal For Sector |
|---|---|---|
| WPA2-Enterprise with my RADIUS server | Requires each user to authenticate with their own credentials (e.g., username/password). | Corporate and Education for secure staff and student access. |
| Splash page with RADIUS authentication | Presents a captive portal for login. Handles social wifi, vouchers, or paid access. | Retail and Hospitality for engaging and controlled guest Wi-Fi. |
| Identity PSK with RADIUS | Assigns a unique pre-shared key (IPSK) to each user or device. | Corporate BYOD and managed IoT devices for secure, revocable access. |
The right choice really depends on who your users are and what you're trying to protect. For a deeper dive into the hardware that makes these solutions possible, check out our guide to Meraki access points.
Knowing how to configure a RADIUS server has become essential for anyone serious about Wi-Fi security. This isn't new technology—it gained massive traction after 2004 when IEEE 802.1X became the standard, helping enterprises cut unauthorized access by up to 85%. While initial misconfigurations can be a headache, a properly tuned server that integrates with Azure AD and SAML is a powerful tool for modern network management.
Untangling Common RADIUS Configuration Problems
So, you've set up your RADIUS server, but something's not quite right. Don't worry, it happens to the best of us. A tiny typo or a blocked port can grind everything to a halt, leaving you wondering where things went wrong. The good news is that most RADIUS issues are surprisingly common and, once you know what to look for, pretty easy to fix.
Let's start with the absolute number one cause of authentication headaches: a mismatched shared secret. This is the password that your RADIUS server and your Cisco Meraki access points use to trust each other. If it’s not exactly the same on both sides—down to the last character and with no extra spaces—authentication will fail every single time.
My Go-To Troubleshooting Checklist
When things aren't working, I always run through a quick mental checklist. It helps isolate the problem without getting lost in the weeds.
Check the Firewall First: Is the path between your Meraki APs and the RADIUS server even open? Firewalls are notorious for blocking traffic you thought was allowed. Make sure UDP ports 1812 (for authentication) and 1813 (for accounting) are open and traffic can flow freely.
Dig Into the Server Logs: Your RADIUS server logs are your best friend. Seriously. They’re a goldmine of information, often giving you a crystal-clear error message that points directly to the problem, whether it's bad credentials, a policy mismatch, or something else entirely.
Verify IPs and NAS Settings: A simple typo in an IP address can send your authentication requests into a black hole. Double-check that the RADIUS server's IP address in your Meraki dashboard is correct. On the server side, confirm that your Meraki APs are properly defined as clients (or Network Access Servers).
Review Your Policies: Are your network policies actually doing what you intend? Take a second look to ensure the conditions you've set—like user group memberships or allowed authentication methods—match what your end-users and their devices are actually trying to do.
Here’s a tip from years of doing this: use a RADIUS test tool. It allows you to fire off a test authentication request from a machine on the same network as your APs. This is the fastest way to figure out if the problem is with the server itself or the communication from your Meraki gear.
Often, the captive portal is where users first notice a problem. If they can't log in, the issue could be the portal's link to the RADIUS backend. Understanding the common reasons for an error in authentication can help you diagnose these portal-specific issues much faster.
In the end, a methodical approach is all you need. Taking it one step at a time is the key to solving any configuration challenge and getting your secure Wi-Fi network running smoothly.
Got Questions About RADIUS Configuration? We've Got Answers.
Let's walk through some of the most common questions we hear from people setting up a RADIUS server for their Wi-Fi networks.
What's the Real Difference Between RADIUS and a Standard Wi-Fi Password?
Think about your typical Wi-Fi password, or WPA2-PSK. It's a single key that everyone shares. If that key gets out—and it always does—your entire network is wide open. Plus, changing it means updating every single device, which is a massive pain.
RADIUS flips the script by giving you individual authentication. Each user gets their own set of credentials. This could be a classic username and password, or a unique key through something like IPSK or EasyPSK. It’s a huge security upgrade because you can instantly revoke access for one person without affecting anyone else. For any Corporate BYOD, Education, or Retail network, having that clear audit trail of who is connecting and when is absolutely essential.
Can I Use RADIUS for Guest Wi-Fi with a Captive Portal?
You bet. In fact, this is where RADIUS really shines. A captive portal from a provider like Splash Access works directly with your RADIUS server and Cisco Meraki hardware to build a modern, secure guest experience.
Instead of just handing out a password, you can open up much better login options for your guests:
- Social Wi-Fi: Let people log in using their existing social media accounts for ultimate convenience.
- Voucher Codes: Easily generate temporary access codes for visitors, contractors, or special events.
- Paid Access: If you want to monetize your Wi-Fi, you can integrate a secure payment gateway.
In all these scenarios, RADIUS is the powerhouse working in the background. It’s the engine that handles all the authentication solutions, making sure every guest connects securely and gets the right access permissions.
Do I Need a Dedicated Physical Server to Run RADIUS?
Not necessarily. While you can definitely run RADIUS on a dedicated box, it's far more common these days to spin it up on a virtual machine (VM).
If you're in a Windows environment, Microsoft's Network Policy Server (NPS) is just a server role you can add to any existing Windows Server. For those who prefer open-source, FreeRADIUS runs great on a lightweight Linux box.
The key isn't whether the server is physical or virtual. What really matters is that it has a rock-solid, reliable connection to your Cisco access points at all times.
Splash Access provides instantly deployable captive portals that integrate with your RADIUS server to create secure, powerful, and insightful Wi-Fi experiences for your users. Learn more about our advanced authentication solutions.


