Ever wondered how your phone just knows how to get online the moment you connect to a guest WiFi network? It feels like magic, but it’s actually a brilliant partnership between two unsung heroes of networking: DHCP and DNS. This dynamic duo is the bedrock of any modern, reliable network, making sure every user gets connected smoothly and securely, whether they're in a school, a shop, or the office.
The Hidden Heroes of Your Guest WiFi Network
Let's break it down with a simple analogy. Think of your network as a bustling hotel. When a new guest arrives with their device—be it a smartphone, laptop, or tablet—they need two things to get around: a room number and a directory of the hotel's amenities.

DHCP (Dynamic Host Configuration Protocol) is your friendly front desk clerk. Its primary job is to greet every device and instantly assign it a temporary "room number"—an IP address. This unique identifier gives the device its own spot on the network, preventing the chaos of duplicate addresses.
DNS (Domain Name System), on the other hand, is the hotel's expert concierge. It serves as the network’s address book, translating the easy-to-remember website names we use (like splashaccess.com) into the numerical IP addresses that computers actually need. Without the DNS concierge, you'd be stuck memorizing long strings of numbers just to check your email.
To put it simply, DHCP gets you on the property, and DNS tells you how to find everything.
DNS vs DHCP Quick Comparison
This table breaks down the distinct roles these two protocols play in getting you online.
| Function | DHCP (The Front Desk) | DNS (The Concierge) |
|---|---|---|
| Primary Role | Assigns IP addresses to devices joining the network. | Translates human-readable domain names into IP addresses. |
| How it Works | A device requests an IP, and the DHCP server leases one from a predefined pool. | A device asks for a website, and the DNS server looks up the corresponding IP. |
| Analogy | Hands out temporary room keys (IP addresses) to guests. | Provides a map or directory to find specific locations (websites). |
| When it's Used | The very first step when a device connects to a network. | Continuously, every time you visit a new website or access a new online service. |
While they handle different tasks, a network can't function properly without both working in perfect harmony.
Why This Partnership Is Crucial
In high-traffic environments like Retail stores, Education campuses, or BYOD Corporate offices, this teamwork isn't just helpful—it's essential. Their seamless collaboration is what powers the modern guest WiFi features we take for granted, such as:
- Captive Portals: Those branded login pages that greet you when you first connect.
- Social WiFi Logins: The convenient option to log in using social media credentials.
- Secure Authentication Solutions: Including robust methods like IPSK (Individual Pre-Shared Key) and EasyPSK.
When this system is dialed in, especially on platforms like Cisco Meraki, the user experience is invisible and flawless. A device gets its IP address from DHCP, which also points it to the DNS server. The user is then seamlessly redirected to a captive portal for a smooth social login, and gets online in seconds. You can learn more about how these components are the true backbone of a network in our detailed guide.
This critical relationship between DNS for DHCP ensures that from the moment a guest connects, their journey from authentication to browsing is fast, secure, and completely automatic.
The Growing Demand for Smart Networks
The need for well-managed DNS for DHCP systems is growing at a staggering pace. The DDI market—which covers DNS, DHCP, and IPAM (IP Address Management)—is exploding. Valued at USD 469.73 million, it's projected to hit an incredible USD 3,951.27 million by 2032. What's driving this? The relentless rise of cloud computing and IoT devices, which are flooding hotels, retail spaces, and corporate campuses with a constant stream of new gadgets that all need IP addresses.
For businesses looking to provide a top-tier guest WiFi experience, turning to specialized managed IT services in Hamilton can offer the expert oversight needed to keep these foundational systems running perfectly. This ensures your network's technical core is rock-solid, freeing you up to focus on what matters most: your guests.
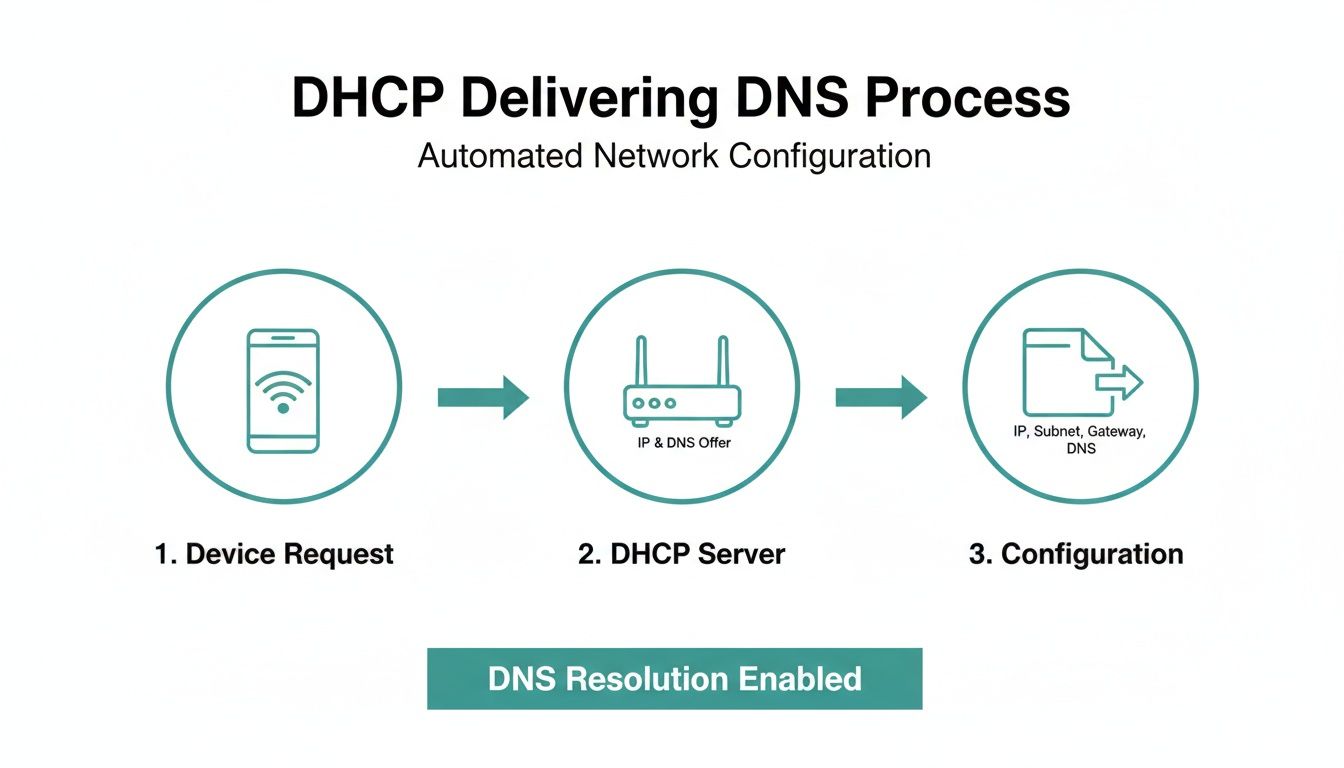
How DHCP Delivers DNS Info to Every Device
So, how does a new device connecting to your WiFi instantly know who to ask for website directions? The magic happens through something called DHCP Options. Think of your DHCP server—like the one built into a powerful Cisco Meraki device—as a hyper-efficient welcome committee for every device that joins your network.
When a device connects, the DHCP server doesn't just hand over an IP address. It delivers a full "welcome packet" of information, containing all the essential details the device needs to get online and start talking to the rest of the world.
This process is a fundamental part of networking, and you can dive deeper into how devices get their unique identifiers in our guide on how to assign an IP address. For now, let's focus on the most important item in that welcome packet.
The Most Important Welcome Gift: DHCP Option 6
Inside this digital welcome packet are several pieces of information, but one stands out as absolutely critical for a smooth user experience: DHCP Option 6. This specific option tells the device the exact IP addresses of the DNS servers it should use.
It’s like the hotel front desk not only giving you a room key but also handing you a card that says, "For any questions, dial extension 123 for the concierge." Without that little card, you'd have no idea who to call for directions to the nearest restaurant.
The whole exchange is quick and completely automatic:
- DHCP Request: A new device connects and asks, "Hi, I'm new here. Can I get an IP address?"
- DHCP Offer: The server (e.g., your Meraki router) replies, "Welcome! Here’s your IP address, your subnet mask, the router's address, and—most importantly—use these DNS servers."
- Device Configuration: The device accepts the info and instantly configures its network settings. Now it knows exactly where to send its DNS queries.
This seemingly simple conversation is the bedrock of a functional network, ensuring every single device knows how to find its way around the internet from the moment it connects.
By using DHCP Option 6, your network automates the entire DNS setup for every user. This eliminates manual configuration, cuts down on support calls, and guarantees a consistent, reliable connection from the very first second.
The Captive Portal Connection
This process is non-negotiable for networks that use Captive Portals, which are common in Education, Retail, and corporate BYOD environments. A captive portal is that login page you see before gaining full internet access, often used for social login or to get you to accept the terms of service.
Picture a student in a university library or a shopper in a mall trying to connect to the guest WiFi. Their device gets an IP address, but if the DHCP server fails to provide the DNS server address via Option 6, the device is effectively stranded. When the user opens their browser, their device tries to look up the captive portal's login page (like login.wifi.com) but has no idea who to ask.
The result? The login page never loads. The user is stuck staring at a "connecting" or "page not found" screen, which quickly leads to frustration and a call to the IT helpdesk.
Securing the Experience with Authentication
This is where advanced authentication solutions come into play. For a seamless experience with systems like IPSK (Individual Pre-Shared Key) or EasyPSK, that initial DHCP-to-DNS handshake has to be flawless. These security methods depend on the device successfully reaching an authentication server—a journey that always starts with a DNS lookup.
In environments managed with Cisco hardware, getting this right ensures that whether a user is logging in with a social media account or a unique pre-shared key, the very first step of their journey is guaranteed. It all comes back to that simple, crucial piece of information delivered in the DHCP welcome packet.
Keeping Your Network Smart with Dynamic DNS
Think about a busy university campus or a corporate office with a "bring your own device" (BYOD) policy. Devices are constantly popping on and off the network—connecting, disconnecting, and moving around all day. Trying to manually track which IP address belongs to which device would be a nightmare.
This is where Dynamic DNS (DDNS) saves the day. It’s essentially an automated messenger service that lets DHCP and DNS talk to each other in real-time. This constant conversation keeps your network's address book perfectly up-to-date, no matter how chaotic the environment gets.
The Automated Handshake Between DHCP and DNS
So, what does this "conversation" actually look like? When a new device, say a student's laptop, connects to the WiFi, the DHCP server hands it an IP address. Right after that, the DHCP server pings the DNS server with a secure, automated update.
This message is simple: "Hey, the device named 'students-laptop' is now using this IP address. Go ahead and update your records." The DNS server then creates or updates its entry, tying that device's name to its new IP address. It’s a simple but powerful interaction that keeps the whole network in sync.
The process looks a little something like this:
This seamless update means administrators and other systems can always find devices by their name, which is absolutely critical for everything from security monitoring to providing internal services.
Why DDNS Is a Game-Changer for Modern Networks
This constant, automated record-keeping is crucial for today's networks, especially in places like Education and Retail where a smooth guest WiFi experience is non-negotiable.
DDNS is the backbone for several advanced functions:
- Network Security: Security tools often need to identify devices by hostname to track down suspicious activity or isolate a threat. DDNS ensures they always have the right IP for the right device name.
- Internal Services: If you host internal websites or file servers, DDNS lets your team access them with easy-to-remember names instead of constantly changing IP addresses.
- Simplified Troubleshooting: When something goes wrong, it’s much faster to track down 'front-desk-tablet' than to figure out what a random IP address is connected to.
The integration of DNS and DHCP is a core part of modern DDI (DNS, DHCP, and IPAM) solutions, and it's completely changing how we manage networks. The global DDI market hit USD 566.6 million in 2023 and is expected to grow by an explosive 22.6% each year through 2030. Why the boom? Because in complex corporate and campus networks, manual IP mistakes can cause up to 30% of all network outages. If you want to dive deeper, you can learn more about DDI market trends and insights.
Secure DDNS updates are the gatekeepers of your network's address book. They ensure that only authorized devices—those that have gone through proper authentication—can register their names, preventing rogue devices from impersonating legitimate ones.
Securing the Conversation
Of course, you can't just let any device on the network update your official address book. That would be a massive security hole. This is why secure DDNS is so important, especially in environments managed by powerful platforms like Cisco Meraki.
Secure DDNS requires that any update request is authenticated. In other words, the DHCP server has to prove its identity to the DNS server before any changes are accepted. This simple step prevents unauthorized devices from "poisoning" your DNS records by falsely claiming a name that belongs to a legitimate device.
This security layer is fundamental for authentication solutions like IPSK and EasyPSK. It guarantees that the devices connecting through your captive portal are who they claim to be, creating a trusted environment for everyone, from guests using a social WiFi login to employees accessing sensitive corporate data.
Practical Steps for Configuring DNS for DHCP
Alright, let's roll up our sleeves. It’s one thing to understand the theory behind how DHCP and DNS shake hands, but it’s another thing entirely to see it click into place on a live network. This is where the rubber meets the road, especially when you're setting up networks in demanding environments like Retail, Education, or a corporate BYOD setup where a perfect guest WiFi experience is non-negotiable.
Whether you're wrangling a complex Windows Server environment, an open-source ISC DHCP setup, or a cloud-managed solution like Cisco Meraki, the mission is the same: make sure every single device automatically gets the right DNS information. Nailing this setup is the bedrock for successful Captive Portals, seamless social login flows, and rock-solid authentication solutions.
Configuring DHCP on a Cisco Meraki Dashboard
For anyone managing WiFi across multiple locations—think retail chains or sprawling school districts—the Cisco Meraki dashboard is a game-changer. Its cloud-first, intuitive interface strips away the usual complexity, making DNS for DHCP configuration remarkably simple. You can get a guest WiFi network up and running in just a few minutes.
The whole process is designed for clarity and speed.
- Head to the DHCP Settings: First, log into your Meraki dashboard and navigate to Security & SD-WAN > Configure > DHCP. This is your command center for all IP address assignments on the network.
- Pick Your VLAN: Next, choose the specific network segment (VLAN) you're working on. If it's a guest network, you'll select the VLAN you've already set aside for visitor traffic.
- Specify Your DNS Servers: In the DHCP options for that VLAN, you’ll see a section for "DNS nameservers." Simply select "Specify nameservers" and punch in the IP addresses of the DNS servers you want your clients to use.
This straightforward approach is perfect for deploying social WiFi or a custom-branded captive portal. You can point guest devices to fast public DNS servers, ensuring they can resolve the login page address instantly. This small tweak makes a huge difference in the user's first impression. It also gives you an easy way to layer on DNS-based content filtering for your guest network.
With Meraki, you can assign different DNS servers to different networks (VLANs) with just a few clicks. Your internal corporate network can use private DNS servers to find local resources, while your guest network uses public DNS for speed and security—all managed from a single pane of glass.
Why This Matters for Authentication Solutions
This seemingly simple configuration has a massive impact on more advanced authentication solutions like IPSK and EasyPSK. These methods give each user unique credentials, adding a serious layer of security. But here’s the catch: they depend on the device being able to reach an authentication server right after connecting.
If the DHCP server fails to hand out the correct DNS info, the device is flying blind—it can't find the authentication server. The user gets stuck, their login attempt fails, and your sophisticated security system is defeated by a basic misconfiguration. For a deeper dive into these fundamentals, our guide on how to configure a DHCP server offers more context.
The Meraki dashboard helps you out here by including a local status page to verify these settings quickly. It’s a great first stop for troubleshooting. This view gives you an at-a-glance confirmation of the device's connectivity, including its DHCP-assigned IP address and DNS details. If those fields aren't populated correctly, you’ve found your culprit.
Common Pitfalls and Best Practices
A small misstep in your DNS for DHCP setup can cause massive headaches, especially in high-traffic spots like a Retail store or a university library. When guests can't get online, it's not just a technical glitch—it's a direct reflection on your brand. Let's walk through the common tripwires and the practical steps to keep your guest WiFi running like a well-oiled machine.
One of the most common problems I see is straightforward DNS resolution failure. A user connects, their device grabs an IP address from DHCP just fine, but then… nothing. They're stuck on a "connecting" screen. This almost always means the DNS server information handed out by DHCP is either wrong or the server itself is unreachable, leaving the device unable to find the captive portal.
This issue gets much worse during peak hours. Picture a busy store during a holiday sale or a campus common area between classes. An unreliable or underpowered DNS server will quickly buckle under the load, leading to a miserable experience for anyone trying to use features like social login.
Mastering Your DHCP Lease Times
An often-overlooked setting with a huge impact is the DHCP lease time—the length of time a device gets to hold onto its assigned IP address. This isn't a "set it and forget it" number; it needs to fit the rhythm of your environment.
- High-Turnover Environments: For a bustling café or a quick-service restaurant, a short lease time—think 30 minutes to an hour—is your best bet. This lets you quickly recycle IP addresses for new customers, preventing your address pool from getting exhausted.
- Long-Stay Venues: In places like a hotel, corporate office, or an Education dorm, a longer lease time of 8 to 24 hours makes much more sense. It provides a stable connection, so a guest’s device isn’t forced to ask for a new IP in the middle of a video call or while streaming a movie.
Security and Segmentation Are Non-Negotiable
When you're offering public WiFi, security can't be an afterthought. A flat network, where guest devices can potentially see corporate resources, is a recipe for disaster. This is where network segmentation becomes your most important tool.
Using VLANs (Virtual Local Area Networks) on your Cisco Meraki equipment is the perfect way to build these digital walls. You can create a completely separate, isolated network just for guests, ensuring their traffic never crosses paths with your sensitive internal data. If you’re running into problems where devices aren't getting IPs in the first place, our guide on what to do when your DHCP server is not responding has some great troubleshooting tips.
A well-segmented network is the foundation of secure guest WiFi. It protects your internal assets while providing a safe browsing environment for your visitors, which is essential for BYOD Corporate policies and public-facing networks.
On top of segmentation, DNS filtering adds another powerful layer of security. By routing guest traffic through a DNS service that blocks malicious websites, phishing scams, and inappropriate content, you create a much safer experience for everyone. This is particularly crucial in the Education sector for maintaining CIPA compliance.
This tight relationship between DNS and DHCP isn't just a technical detail; it's a huge business enabler. The market for integrated DNS, DHCP, and IPAM (DDI) solutions is currently valued at USD 2.5 billion and is expected to climb to USD 6.1 billion by 2033. This growth is being driven by the enormous strain that IoT and 5G are putting on older network infrastructures, with address exhaustion now causing a staggering 25% of DHCP issues. In a busy retail setting, a solid DDI strategy prevents IP conflicts when WiFi traffic spikes by 10x during a Black Friday sale. You can discover more insights about these market trends and what they mean for IT teams.
Getting these fundamentals right ensures your network is robust, secure, and ready to handle modern authentication solutions like IPSK and EasyPSK. By sidestepping these common pitfalls, you deliver a seamless connection that powers a great user experience, from the moment they log in with social WiFi to a full day of hassle-free browsing.
DNS & DHCP Best Practices for Guest WiFi
To tie it all together, here’s a quick checklist to make sure your guest WiFi is both user-friendly and secure. Following these guidelines will help you avoid the most common issues and keep your visitors happily connected.
| Best Practice | Why It Matters | Impact on Guest Experience |
|---|---|---|
| Use Reliable Public DNS | Assign fast and reliable public DNS servers (like 8.8.8.8 or 1.1.1.1) to guest VLANs. | Prevents frustrating "page cannot be displayed" errors and ensures quick access to the captive portal. |
| Isolate Guest Traffic | Use a dedicated VLAN to completely separate guest traffic from the corporate network. | Protects your internal resources from potential threats and gives guests a secure connection. |
| Optimize Lease Times | Set short lease times (30-60 min) for high-turnover areas and longer times (8-24 hrs) for long-stay venues. | Prevents IP address exhaustion in busy locations and provides stable connectivity for long-term guests. |
| Implement DNS Filtering | Block access to malicious sites, phishing scams, and inappropriate content at the DNS level. | Creates a safer browsing environment for all guests, protecting them from online threats. |
| Monitor Your DHCP Pool | Keep an eye on your available IP address pool to avoid running out during peak hours. | Ensures every guest who tries to connect can get an IP address without delay. |
By implementing these best practices, you're not just configuring a network; you're designing a reliable and secure experience that reflects positively on your organization.
Common Questions About DNS and DHCP
When you're setting up a network, especially for guest WiFi, the technical details can get a little tricky. The relationship between DNS and DHCP is one of those areas that, when you get it right, makes everything from captive portals to advanced security just work. Let's break down some of the most common questions we see.
Can I Use Different DNS Servers for Guest and Corporate Networks?
You absolutely can, and you absolutely should. This is a standard best practice for keeping your network secure and running smoothly.
Think of it this way: your internal corporate network needs to talk to internal resources like file servers and printers. Using a private, internal DNS server makes that possible. Your guests, on the other hand, just need to get to the internet.
By using separate network segments (like VLANs) in a system like Cisco Meraki, you can tell the DHCP server to hand out your private DNS to employees and a fast, public DNS to guests. This simple separation is a huge win—guests get a snappy internet experience, and they have zero visibility into your private corporate resources.
Why Isn't My Captive Portal Loading for Guests?
This is probably the number one headache we see, and the cause is almost always a DNS for DHCP misconfiguration. A guest connects to the WiFi, their phone says they're connected, but the login or welcome page never shows up. Sound familiar?
Here’s what’s happening behind the scenes: The device got an IP address from DHCP, but it didn't get the address of a working DNS server. Without DNS, the device can't figure out how to find the captive portal's address (like login.wifi.com). It's like having a street address but no map to find it—the request goes nowhere, and the page fails to load.
The fix is usually simple. Dive into the DHCP settings for your guest network and make sure DHCP Option 6 is correctly configured to point to a valid DNS server. This one check solves the problem 9 times out of 10. For a full guide on building a great visitor experience from the ground up, check out our tutorial on how to set up guest WiFi.
How Does DNS Impact Advanced Authentication Methods?
Modern security features like IPSK or EasyPSK are fantastic for securing BYOD Corporate environments because they give each user a unique key. But for these systems to work, a device has to be able to talk to an authentication server the moment it joins the network.
That conversation starts with a DNS lookup. If the DHCP server doesn't provide the right DNS info, the device has no way of finding that authentication server. The login process will fail before it can even start, making your advanced security completely useless. A rock-solid DNS for DHCP setup is the foundation that all these security features are built on.
Think of DNS as the GPS for your network's security services. If DHCP doesn't hand out the right GPS coordinates (the DNS server addresses), your authentication systems are effectively invisible and unreachable for any new device trying to connect.
What Are the Best DNS Servers to Use for Guest WiFi?
For most guest WiFi networks in places like Retail shops or Education campuses, sticking with well-known public DNS servers is your best bet. They’re fast, reliable, and managed by pros, which means you don’t have to worry about uptime.
Here are a few solid choices:
- Google Public DNS: A workhorse known for speed and dependability.
- Cloudflare DNS: Built with a heavy focus on user privacy and performance.
- Quad9: Adds a layer of security by blocking known malicious sites, protecting your guests from malware and phishing.
Configuring your DHCP server to hand out one of these to your guests ensures that features like social login and social wifi are quick and responsive. It all adds up to a much better, smoother experience for your visitors.
At Splash Access, our job is to make these complex network pieces fit together perfectly. Our platform works hand-in-glove with systems like Cisco Meraki to deliver a WiFi experience for your guests that is secure, reliable, and engaging.
Discover how Splash Access can transform your guest WiFi today.


