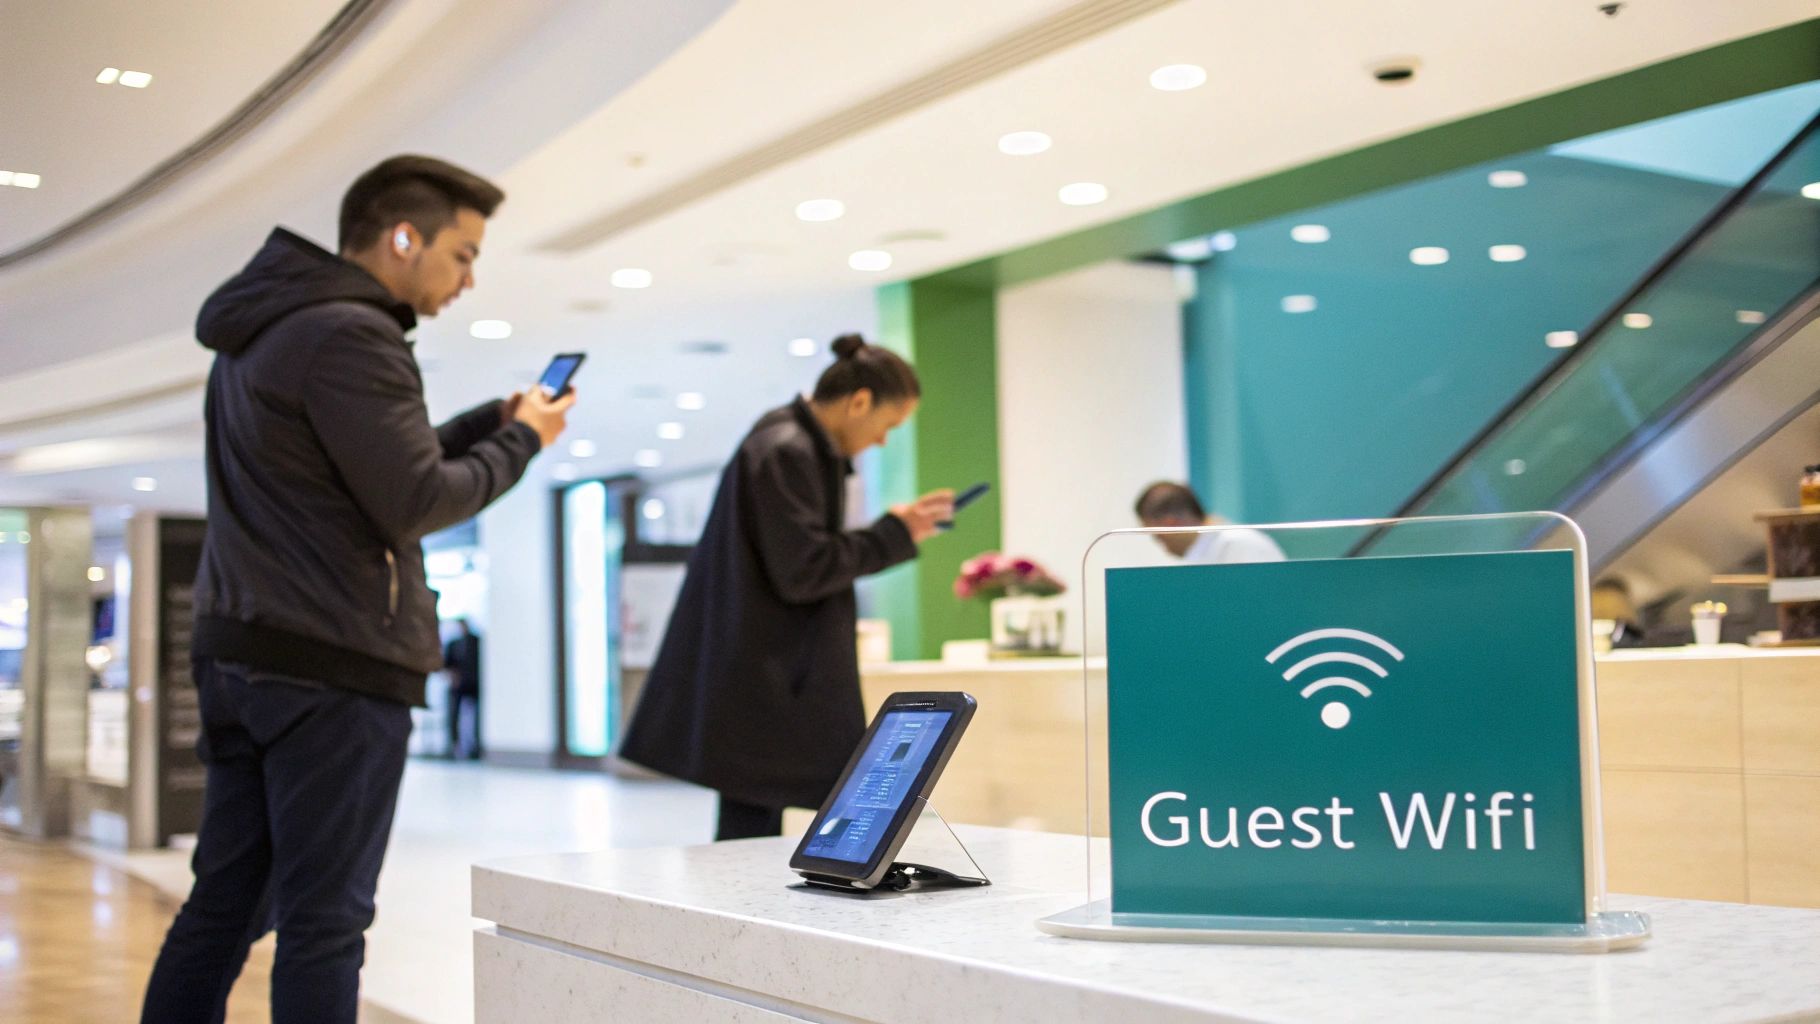
Ever wonder what makes guest WiFi just work? That effortless connection you get in a coffee shop, airport, or school library is no accident. Behind the scenes, a friendly digital concierge called a DHCP server is working its magic, automatically handing out an IP address to every device asking to get online.
Get it right, and your network is fast, reliable, and secure. Get it wrong, and you're staring down the barrel of connection drops, user complaints, and a whole lot of frustration. Let's make sure you get it right!
Why Your DHCP Server Is Key to Great Guest WiFi
A misconfigured DHCP server is often the root cause of those mysterious network problems that are so hard to pin down. This guide will walk you through setting up your DHCP server to not only avoid issues but to create a powerful and secure network experience. We'll spend most of our time in the Cisco Meraki dashboard, a popular choice in education and retail, but we’ll also touch on Windows Server and Linux to give you a well-rounded perspective.
Let's get your network running flawlessly.
The Foundation of Modern Guest Access
Think about the sheer volume of devices in modern environments. In sectors like Education, Retail, and corporate BYOD (Bring Your Own Device) offices, reliable WiFi isn't a perk; it's a necessity. The DHCP server is what makes it all possible, managing the constant churn of devices connecting and disconnecting throughout the day.
The scale of this technology is massive. The global DHCP services market is valued at approximately USD 2.26 billion, a clear indicator of its importance. For large organizations, automating IP address management with DHCP can slash manual network admin tasks by up to 70%. On the flip side, misconfigured DHCP settings are responsible for a staggering 40% of network outages in small to medium-sized businesses.
A DHCP server is more than just a utility; it's the bedrock of your network's security and user experience. It performs the first digital handshake with any device, setting the stage for everything that follows—from Captive Portals to advanced Authentication Solutions.
How DHCP Configuration Solves Sector-Specific WiFi Challenges
Let's take a quick look at why a properly configured DHCP server is so critical for different business environments.
| Sector | Primary Challenge | DHCP Solution Benefit |
|---|---|---|
| Retail | High volume of short-term guest connections, data capture. | Short lease times free up IPs quickly. Pushes DNS for captive portal redirects for social wifi. |
| Education | Large number of diverse devices (laptops, tablets, phones). | Manages huge IP pools across multiple VLANs for students, faculty, and guests. |
| Hospitality | Seamless roaming between different areas (lobby, rooms, pool). | Ensures devices maintain a stable connection as they move between access points. |
| Corporate | Securely separating guest traffic from internal network traffic. | Assigns guest devices to an isolated VLAN, often with IPSK or EasyPSK authentication. |
As you can see, the core function is the same, but the configuration details make all the difference in delivering a great user experience tailored to the environment.
Beyond IP Addresses: Authentication and Security
A well-configured DHCP server is just the first step in a much larger security and authentication process. Once a device has its IP address, you can guide it to a Captive Portal for a secure login. This is where you can unlock some powerful capabilities:
- Social WiFi Login: Let guests connect using their social media accounts. It’s a win-win: they get easy access, and you get valuable (and anonymous) marketing insights.
- Advanced Authentication: Integrate with systems like IPSK (Identity Pre-Shared Key) and EasyPSK. This is perfect for corporate BYOD policies, as it provides a unique, secure password for every user and device.
- Enhanced Security: The simple act of controlling the IP assignment process is your first line of defense. It lays the groundwork for preventing unauthorized devices from ever touching your network.
Ultimately, mastering DHCP is a fundamental skill for any network administrator. If you're building a guest network from the ground up, our guide on how to set up guest WiFi is a great place to start.
Configuring DHCP on a Cisco Meraki Network
When you jump into the Cisco Meraki dashboard, you’ll see why it’s a favorite in places like Education, Retail, and corporate BYOD environments. Setting up DHCP is refreshingly simple. Whether you’re running it on a Meraki MX security appliance or directly from your MR access points, the tools are powerful and intuitive.
Let's walk through the process of getting your DHCP server configured in this ecosystem. The goal is to build a network that's robust, secure, and ready for anything—from a handful of staff devices to a weekend rush of guest WiFi users.
Choosing Your DHCP Server Source
First things first, where will the DHCP service actually run? In a Meraki setup, you have a couple of solid options. The big decision is whether to handle it on a Meraki Security Appliance (the MX) or let the Access Points (MR) do the job.
- Using a Meraki MX Security Appliance: This is the go-to for most networks, and for good reason. The MX is your central gateway and firewall, making it the perfect spot to manage IP addresses for all your VLANs and SSIDs. It gives you the most control and the richest feature set.
- Using Meraki Access Points (MR series): For simpler setups, the access points can run their own lightweight DHCP server. Think of a small coffee shop or a pop-up event where you don't have a dedicated MX appliance. In this mode, the APs create their own little NAT'd network for wireless clients.
My two cents: If you have more than one AP or plan on using VLANs to separate traffic (like keeping staff and guest networks apart), always run DHCP on your MX appliance or a dedicated server. It centralizes everything and saves you from a world of potential headaches down the road.
Setting Up DHCP on a Meraki MX
Configuring DHCP on an MX really boils down to defining the scope for each of your VLANs. Picture a typical office with separate networks for employees, guests, and maybe even IoT devices like printers and cameras. Each gets its own VLAN, and therefore, its own DHCP scope.
You'll find these settings in the Meraki dashboard under Security & SD-WAN > Addressing & VLANs. From there, you just enable VLANs and punch in the DHCP settings for each one. You’ll define the subnet, the gateway IP (which is the MX itself), and the range of addresses you want to hand out.
This is also where you’ll want to tweak the lease time. In a busy Retail environment with customers constantly coming and going, a short lease time of 1-4 hours is ideal for recycling IPs quickly. For an office where employees stay connected all day, a longer lease of 8-24 hours makes more sense.
The Role in Guest WiFi and Authentication
This DHCP configuration is the bedrock of your guest WiFi system. The moment a guest connects, the Meraki DHCP server assigns them an IP address. That's the first step before they're whisked away to a Captive Portal, which is where you can present social login options or ask for an email address.
In secure BYOD environments, this DHCP process integrates tightly with tools like IPSK and EasyPSK. When an employee registers their phone, the system ensures it gets an IP address from the corporate VLAN. Any other new device trying to connect gets automatically pushed over to the guest network. Your DHCP server becomes an active part of your security posture. Of course, this all relies on solid infrastructure, and you can learn more about best practices for a professional installation of a wireless network to make sure it all works seamlessly.
DHCP on Meraki Access Points: A Simpler Approach
What if you're not using an MX? If you set your MR access points to "NAT mode," the setup is even easier. Just head to the SSID settings under Wireless > Access control and choose "NAT mode: Meraki DHCP."
The access points will then create an isolated wireless network and manage a small pool of IP addresses just for clients on that SSID. This is a fantastic way to spin up a quick guest WiFi network without touching your core network configuration. Guest devices get an IP from the AP, and their traffic is NAT'd, keeping them completely walled off from your internal servers and workstations. It's simple, secure, and incredibly effective for smaller venues.
Connecting DHCP to Your Authentication Strategy
Once you've got the basics of your DHCP server configuration sorted, you can really start to see its full potential. A DHCP server does more than just hand out IP addresses; it's the very first step in a much larger security and authentication process that shapes the entire user experience on your network.
This is where things get interesting, especially for networks in Education, Retail, and corporate BYOD environments. When a new device shows up, DHCP handles the initial handshake. But what happens next is what separates a simple, flat network from a smart, secure, and data-rich one.
From IP Address to User Engagement
Think about the typical journey someone takes when they connect to your guest WiFi. Right after their device gets an IP address from your DHCP server, you have a golden opportunity. Instead of just letting them browse freely, you can route them straight to a Captive Portal. This is your gateway to a whole suite of authentication and engagement tools.
For a retail store or a hotel, this is a complete game-changer. A captive portal can offer social login options, letting guests connect with their existing social media accounts. This creates a smooth, frictionless experience for them while giving the business valuable (and anonymized) demographic data to better understand its customers. Suddenly, a simple social wifi connection becomes a powerful marketing asset.
The moment a DHCP server assigns an IP, it kicks off a chain of events. This is your chance to engage, secure, and understand every user, turning a technical process into a strategic business asset.
Securing the BYOD Landscape with IPSK and EasyPSK
In a corporate or Education setting, the challenges are quite different. The explosion of BYOD means countless personal devices need network access, but keeping things secure is non-negotiable. This is where advanced authentication solutions like IPSK (Individual Pre-Shared Key) and EasyPSK come into their own, working in perfect harmony with your DHCP server.
Here’s a breakdown of how this powerful combination works:
- A user registers their personal device, whether it's a laptop or a smartphone.
- The system generates a unique, private password (an IPSK) just for that specific user and their device.
- When the device connects, DHCP assigns it an IP address from the correct, secure VLAN.
- The IPSK system then authenticates the device, making sure only authorized users can get to sensitive internal resources.
This approach gives your security a massive boost. It completely gets rid of the risks tied to shared passwords, which, if compromised, could leave your entire network exposed. Every user gets their own key. If a device is lost or an employee leaves the company, you just revoke that one key without disrupting anyone else. It's the modern, sane way to manage a diverse and dynamic BYOD environment.
The Strategic Value of an Integrated System
Tying DHCP into a robust authentication system isn't a niche strategy anymore; it's quickly becoming standard practice. Enterprise adoption of these advanced DHCP setups is on the rise, especially with vendors like Cisco that serve the demanding needs of Retail and hospitality. For instance, hotels using DHCP scopes configured for IPSK can slash unauthorized network access by an incredible 95%. That's a huge deal when you realize that around 60% of data breaches can be traced back to poor network configuration.
On the marketing side, using social WiFi integrations on captive portals can increase marketing ROI by 35%, thanks to the rich guest data you can capture right after a DHCP lease is granted.
This integrated approach brings together multiple layers of technology. The DHCP server handles the IP logistics, while a RADIUS server often does the heavy lifting for authenticating systems like IPSK. To get a better handle on how these pieces fit together, take a look at our guide on how to set up a RADIUS server for your network. When you combine them, DHCP and RADIUS form a powerful duo for network security and control.
Ultimately, by connecting your DHCP server to a broader authentication strategy, you transform a fundamental network utility into a powerful tool for security, marketing, and user management. It’s exactly how modern organizations in Education, Retail, and the corporate world are building smarter, safer, and more valuable networks.
Mastering Advanced DHCP Features
Once you've got the basics down, it’s time to dig into the advanced DHCP features that give you real, fine-grained control over your network. These aren't just obscure settings; they're essential tools for building a network that's more efficient, secure, and ready to scale. This is especially true in complex environments like universities, sprawling retail centers, and corporate offices dealing with demanding BYOD policies.
Let's move beyond just handing out IP addresses and start architecting a smarter, more responsive network. We'll look at how to guarantee access for critical devices, push out custom configurations, and seamlessly manage IP addresses across a segmented network.
Why DHCP Reservations Are a Network Admin’s Best Friend
Imagine your main office printer or a critical security camera suddenly going offline because its IP address changed. It’s a frustrating and completely avoidable problem. DHCP reservations are the simple, elegant fix.
A reservation, sometimes called a static DHCP assignment, simply tells your DHCP server to always give the same IP address to a specific device. This is done by linking a device’s unique MAC address to an IP address you choose from your scope. It’s perfect for:
- Servers and Printers: Ensures they're always reachable at a predictable address. No more hunting down a new IP.
- Security Cameras: Guarantees your surveillance system never loses contact with a camera.
- Point-of-Sale (POS) Systems: Provides the stability needed for critical transaction hardware in retail.
Setting this up, especially in a Cisco Meraki environment, is incredibly straightforward. You get the rock-solid reliability of a static IP without the headache of manually configuring every single device.
Going Further with DHCP Options
While an IP address gets a device on the network, DHCP options tell it what to do once it's there. Think of them as extra configuration details your DHCP server can push to clients along with their IP lease. You're already using common ones like the subnet mask and default gateway, but there's so much more they can do.
For example, you can use DHCP options to assign specific DNS servers, which is crucial for directing guest traffic through content filters or to a captive portal for authentication. In a corporate setting, you might use options to point devices to a time server (NTP) or a TFTP server for booting IP phones. This level of granular control is what separates a basic network from one that provides a polished and functional user experience.
The Power of DHCP Relay in Segmented Networks
Now for the real game-changer in complex networks: DHCP Relay. In most large corporate or Education settings, you don't have one big, flat network. Instead, you use VLANs (Virtual Local Area Networks) to segment traffic for security and performance—separating student WiFi from faculty resources, or the public guest network from the secure corporate LAN.
The catch? DHCP requests are broadcast messages, and routers, by design, don't forward broadcasts between VLANs. This is where a DHCP Relay Agent (often called an "IP Helper Address" in the Cisco world) saves the day.
Here's a practical scenario: A university student connects to the "Student-WiFi" SSID, which lives on VLAN 20. Their laptop sends out a broadcast shouting, "I need an IP address!" The router for VLAN 20, configured as a DHCP relay, intercepts this request. It then repackages it as a unicast packet and sends it directly to your centralized DHCP server, which might be on a completely different network segment, like VLAN 100. The server sees the request came via the VLAN 20 relay, grabs an available IP from the student scope, and sends it right back.
This process is the essential first step before a user can be directed to a portal for authentication.
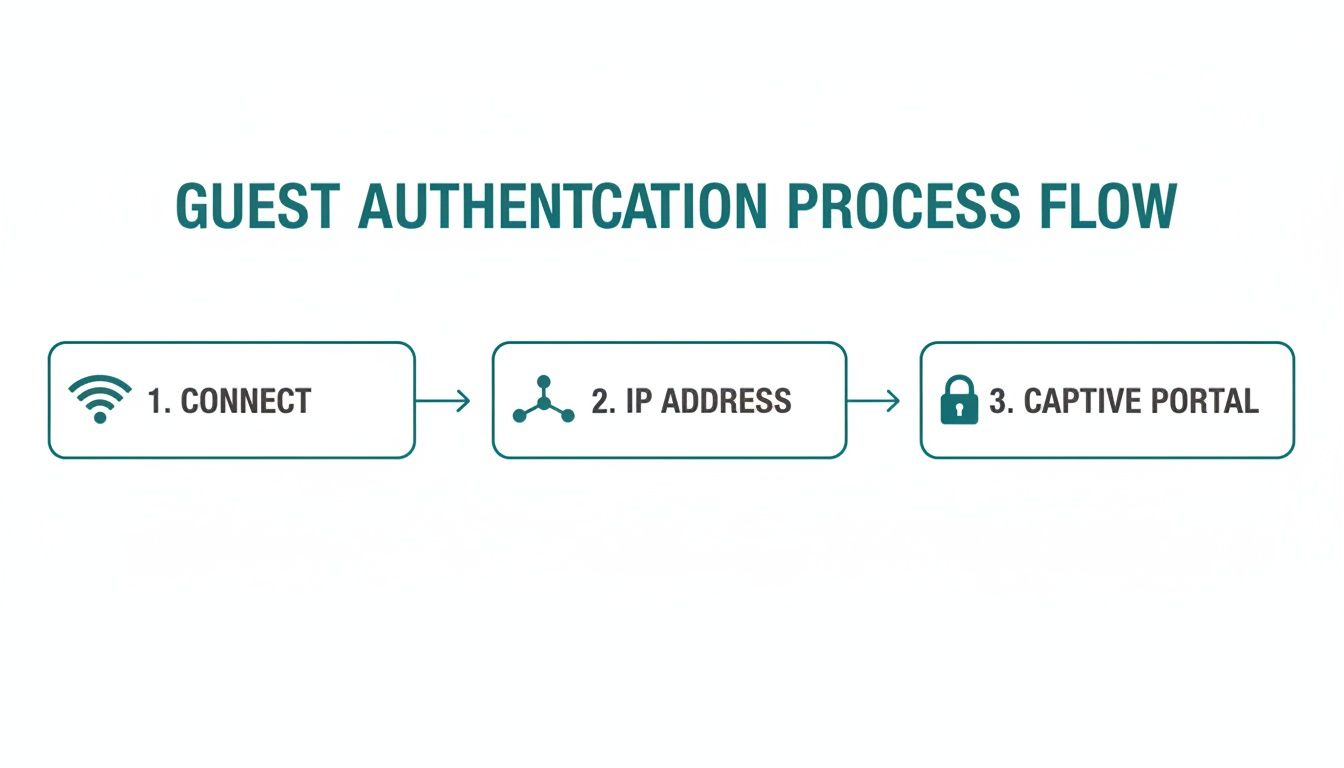
As the flow shows, without a successful DHCP lease, authentication solutions like social login or IPSK never even come into play.
A DHCP relay architecture is the key to scalability. It allows a single, powerful DHCP server to manage IP addresses for dozens of VLANs across an entire organization, dramatically simplifying administration and troubleshooting.
This centralized approach is a cornerstone of modern network design. To get a better handle on the "why" behind this structure, you can learn more about network segmentation best practices and see how they boost both security and manageability.
To help you decide which of these features to prioritize, here’s a quick breakdown of where each one shines.
When to Use Key DHCP Features
| Feature | Best Use Case | Why It's Important |
|---|---|---|
| DHCP Reservations | Critical infrastructure like servers, printers, and security cameras. | Guarantees devices are always reachable at a known IP, preventing downtime and simplifying management. |
| DHCP Options | Customizing client configurations, like setting DNS servers for content filtering or VoIP phone boot servers. | Automates device setup, ensuring a consistent and controlled user experience across the network. |
| DHCP Relay | Networks with multiple VLANs, such as corporate, campus, or hospitality environments. | Allows a single DHCP server to serve multiple subnets, centralizing IP management and simplifying administration. |
By mastering reservations, options, and relay, you’re not just configuring a DHCP server—you’re building a smarter, more resilient network that’s truly optimized for your organization's specific needs.
DHCP on Your Own Servers: Windows and Linux
While the Cisco Meraki dashboard is a dream to work with, many networks, especially in larger corporate or campus environments, still run DHCP on traditional servers. It's incredibly common to see a shiny new Meraki Wi-Fi deployment that needs to get its IP addresses from an existing Windows Server or a battle-hardened Linux box.
Don't worry, the fundamentals are exactly the same. Whether you're clicking through a GUI or editing a text file, you're still just defining scopes, setting ranges, and assigning options. Getting comfortable with these platforms will give you the flexibility to manage DHCP wherever it lives.
Setting Up a DHCP Server on Windows
If your network is built on Microsoft infrastructure, you'll most likely be working with Windows Server. Adding the DHCP role is a straightforward task right from the Server Manager.
Once you install the "DHCP Server" role, a new set of management tools appears. Your first job is to create a "scope"—that's just the official term for the pool of IP addresses the server is allowed to hand out.
When you configure a new scope, you'll need to specify a few key details:
- IP Address Range: The starting and ending addresses for the pool.
- Subnet Mask: This defines the size of your local network.
- Exclusions: Got printers, servers, or other devices with static IPs? You'll list them here so the DHCP server knows not to assign those addresses to anyone else.
- Lease Duration: How long a device gets to hold onto its assigned IP before it has to renew.
This process is the first critical step in the user journey. The server hands out an IP, and only then can the device be redirected to a captive portal for a social login or be validated against an IPSK or EasyPSK system.
A Quick Look at Linux and ISC DHCP
For the open-source crowd, the ISC DHCP server (often called isc-dhcpd) is the gold standard on Linux. It's rock-solid and can handle almost anything you throw at it, but you'll be working from the command line. Instead of a graphical wizard, all your configuration happens in a single text file, usually found at /etc/dhcp/dhcpd.conf.
The syntax is pretty intuitive once you see it. You declare a subnet, define the range of available IPs, and then list your options, like the default gateway and DNS servers.
The command line can feel a bit daunting at first, but many admins find it's actually faster. Once you know the structure, you can make changes in a config file much quicker than clicking through multiple GUI windows. The principles are identical to what you do in Windows or the Meraki dashboard.
In a large-scale BYOD network for a corporation or school, a well-configured Linux DHCP server can manage thousands of leases without breaking a sweat. It's a cost-effective and massively scalable option that works perfectly with your wireless gear. The key is to set up your network switches and Meraki APs to act as DHCP relays, forwarding all those IP requests straight to your central Linux server.
Troubleshooting Common DHCP Issues
Even in a perfectly planned network, things can go wrong. When users suddenly can't connect, DHCP is often the first place I look. Let’s walk through some of the usual suspects, especially in busy places like schools, retail stores, or any office with a heavy BYOD policy.

The classic "I can't get online" ticket almost always boils down to a device failing to grab an IP address. That single symptom can point to a bunch of different root causes, so the trick is to zero in on the right one quickly.
The Diagnostic Checklist
Before you start digging into packet captures, run through the basics. You'd be amazed how often the solution is something simple. A quick, methodical check can save you a ton of time and frustration.
- Is the DHCP Service Running? It sounds almost too obvious, but services crash or get stopped for maintenance. Your first click should be to check the service status on your server or within the Cisco Meraki dashboard.
- Have You Run Out of IPs? Take a look at your scope utilization. I’ve seen this happen in busy retail locations where a small IP pool gets depleted by high device turnover, leaving new customers with no way to connect.
- Are VLANs Correctly Tagged? This is a classic trip-up. If a wireless network (SSID) is mapped to the wrong VLAN, client DHCP requests go nowhere. They're shouting into a void and will never reach the server with the IP pool they need.
- Is DHCP Relay Configured? If your clients are on a different VLAN from your DHCP server, you need a relay. Without that IP helper address on the router or Layer 3 switch, DHCP requests from client subnets simply get dropped and never make it to the server.
One of the sneakiest and most disruptive problems is a "rogue" DHCP server. This happens all the time in BYOD environments. Someone plugs in a home router at their desk, and it suddenly starts handing out bad IP addresses, creating total chaos for anyone on that part of the network.
Impact on Authentication and Guest WiFi
When DHCP breaks, it creates a domino effect that takes down your entire authentication stack. If a device can't get an IP lease, it can't even be redirected to your Captive Portal. That means no social login for your guest social WiFi and no way for users to accept your terms and conditions.
It’s the same story for more advanced security setups. Systems like IPSK and EasyPSK depend on a device first getting a valid IP on the correct, secure VLAN. When DHCP fails, your authentication solutions are dead in the water, and legitimate users get locked out.
If you're stuck on this particular point, we've got a post that goes into more detail on what to do when your DHCP server is not responding.
Working through these common issues methodically will almost always lead you to the root of the problem. Getting it fixed quickly means your guest WiFi experience stays smooth and your internal network remains both secure and functional.
Common Questions on DHCP Configuration
We've walked through the technical steps, but a few questions almost always come up in the field when setting up a DHCP server. Let's get them answered.
What’s the Right Lease Time for Guest WiFi?
This really depends on who’s using your network and for how long.
For places with high foot traffic and short visits, like a retail shop or a busy coffee house, a short lease time is your best bet. Think one to four hours. This approach frees up IP addresses quickly, ensuring new visitors can always connect to your guest WiFi.
On the other hand, in an Education setting or a corporate BYOD environment, users tend to stay connected for the entire day. A longer lease of eight to 24 hours makes more sense here. It cuts down on the background noise of constant renewal requests on your network.
Can I Have Two DHCP Servers on the Same Network?
You absolutely can, but you have to be smart about it. Running two DHCP servers is a great way to build in redundancy, using a failover or a split-scope configuration.
Warning: Never, ever configure two independent DHCP servers to hand out IPs from the exact same address pool. That’s a recipe for IP address conflicts and a network-wide headache.
A much safer and more common strategy is the split-scope model. This is where you divide the address pool between the two servers, so they aren't stepping on each other's toes.
How Do I Make DHCP Work Across Different VLANs?
By design, DHCP broadcast messages are stuck within their own VLAN. They can't just hop over to another one.
To get around this, you need to set up what's known as a DHCP Relay Agent. On Cisco equipment, this is often called an "IP Helper Address." You configure this on your router or Layer 3 switch, and its job is to listen for DHCP requests and forward them to your main DHCP server, no matter which VLAN they came from.
This is a critical piece of the puzzle, especially when you need to guide users to a Captive Portal for social login or use IPSK for secure device authentication.
Ready to integrate a powerful captive portal and authentication solution with your Cisco Meraki network? Splash Access provides seamless integration for guest WiFi, social login, and advanced security like EasyPSK. Learn more about Splash Access.


