Hey there! Let's be honest, managing secure remote connections for your team can be a real headache. This is especially true in busy environments like schools, retail chains, or corporate offices where everyone brings their own device (BYOD). The Cisco Meraki Client VPN is designed to fix this exact problem. It’s a cloud-managed solution from Cisco that makes secure remote access surprisingly simple.
Making Remote Access Simple with Meraki Client VPN
The real magic of the Meraki Client VPN is how it's completely built into the Cisco Meraki Dashboard. Forget about messing with command lines or poring over dense configuration files. You can deploy a secure, reliable VPN for your entire organization with just a few clicks. For any IT team, this is a massive time-saver that frees you up for more important work.
This simplicity is a huge win for a few key sectors:
- Education: Students and staff can get secure access to campus resources from anywhere, keeping the learning going without a hitch.
- Retail: Store managers and corporate employees can securely connect to inventory and sales systems, whether they're in-store or on the road.
- BYOD Corporate: You can onboard personal devices smoothly without punching holes in your network security—a common struggle in today's flexible office environments.
The Growing Need for Secure Connections
The move to flexible work isn’t just a passing trend; it has lit a fire under the VPN market. The global VPN market was valued at around $25 billion back in 2019, and it's only grown since then, thanks to the demands of remote work and ever-present cybersecurity threats. Meraki's client VPN is right at the heart of this shift, offering a scalable and secure way for businesses of all sizes to adapt.
This isn't just a trend; it's a fundamental change in how we work. A reliable Client VPN isn't a "nice-to-have" anymore—it's essential infrastructure for maintaining productivity and security.
Beyond VPN Authentication Solutions
A solid VPN is a fantastic first line of defense, but real security is all about layers. As you set up your Meraki Client VPN, it’s a great idea to think about how it fits into your bigger security picture. Many organizations are now embracing the principles of Zero Trust Security, which is built on the simple idea of "never trust, always verify."
This mindset perfectly complements a VPN. It ensures that even after a user connects, they can only access the specific resources they absolutely need for their job. This becomes critically important when you're managing different authentication solutions, from a basic Captive Portal to more robust options like IPSK or EasyPSK that give each user a unique credential, adding powerful layers of control and visibility.
Getting Your Dashboard Ready for VPN
Before we dive into the nuts and bolts of setting up your Client VPN Meraki configuration, let's take a moment to get the dashboard prepped. Think of it as a pre-flight check. Spending a few minutes here in the Cisco Meraki Dashboard can save you a world of hurt down the road.
First, you need to know where you're going. Everything we need is tucked under the Security & SD-WAN tab in the main navigation menu. From there, just click on Client VPN. This little corner of the dashboard will be our home base for the entire setup.
Picking the Right Authentication Method
This is probably the most critical decision you'll make for your remote access setup. Meraki gives you a few different ways to handle user authentication, and the best one for you really boils down to how your organization is structured.
-
Meraki Cloud Authentication: This is the path of least resistance. You create user accounts right inside the Meraki dashboard. It’s perfect for smaller teams or if you just need to get something up and running fast without a lot of fuss.
-
Active Directory: If your company runs on Microsoft's Active Directory, this is a no-brainer. It lets everyone use their existing company username and password, which is exactly what you want for corporate environments, especially with BYOD policies.
-
RADIUS Server: For more complex networks or those using a different identity provider, RADIUS is your go-to. It acts as a bridge. We see this a lot in the Education sector, where schools need to tie into their existing student and staff databases for access.
Juggling the licenses for these systems can sometimes be confusing. If you're unsure about the requirements, our guide on Meraki subscription licensing is a great resource to clear things up.
Why This Decision is So Important
Choosing your authentication method is more than just a technical step; it shapes your security posture and your end-user's experience. In a Retail business, for example, tying VPN access to Active Directory is non-negotiable. It ensures that only active employees can get to sensitive inventory or sales systems from home.
In a school district, integrating with a central directory is mission-critical. It means when a student graduates or a teacher leaves, their VPN access is automatically cut off. You don't have to worry about manually scrubbing a separate user list, which is a huge security win.
This initial choice also paves the way for more sophisticated security measures later on. Once you have your authentication foundation in place, you can start looking at things like IPSK or EasyPSK. These technologies let you issue unique passwords for every single device or user, which is fantastic for locking down Wi-Fi networks that use Captive Portals or have a ton of personal devices connecting.
Choosing the Right Authentication for Your Meraki VPN
With the initial dashboard prep out of the way, we can get down to the real work: setting up a rock-solid authentication method for your remote users. This isn't just a technical step; it's about choosing the right security foundation for how your organization actually operates.
Think about an Education campus needing to provide different levels of network access for students versus faculty. Or a Retail chain where store managers require secure access to corporate inventory systems. The authentication solution you select is what makes these scenarios possible without compromising security.
This decision tree gives you a great visual starting point for figuring out which path makes the most sense for your environment.
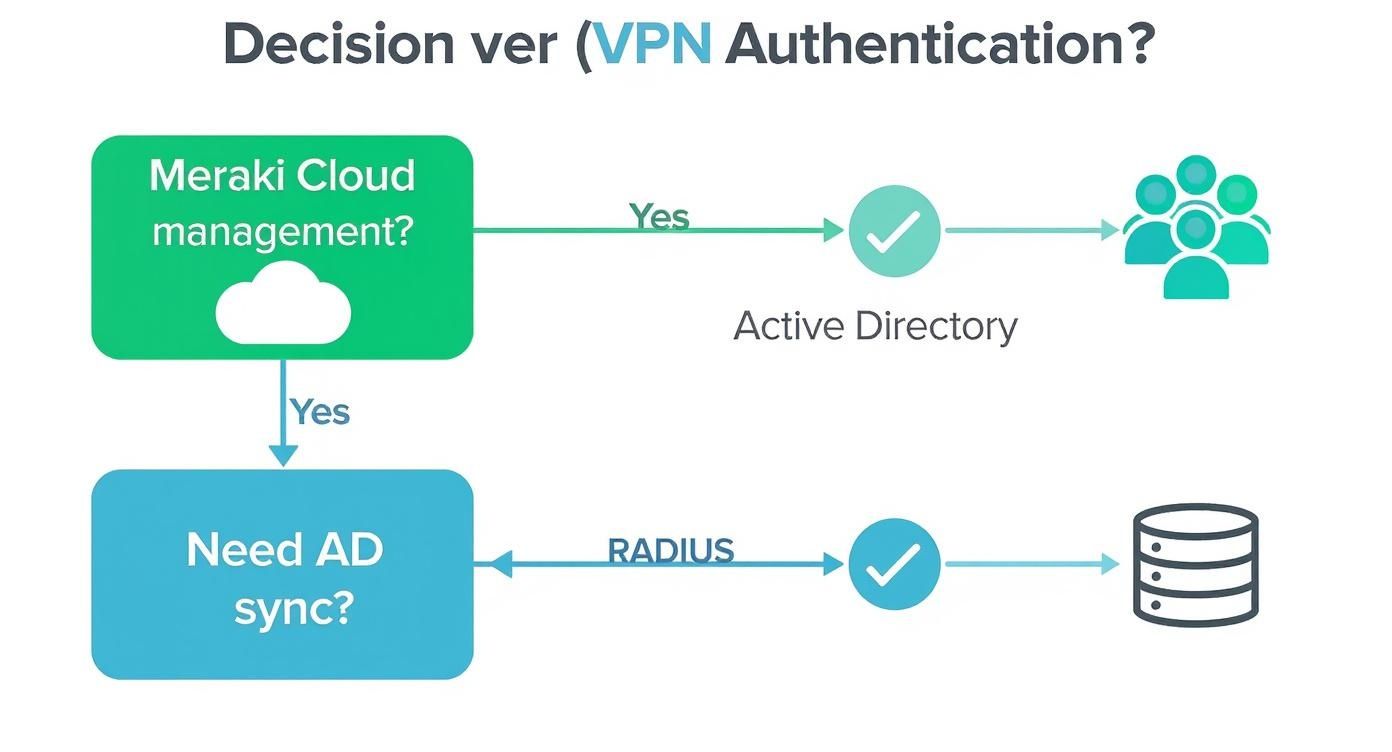
Ultimately, your choice here dictates how you'll manage users and whether you can integrate with systems you already have. Getting it right from the beginning saves a ton of headaches later.
Choosing Your Meraki Client VPN Authentication Method
Deciding on the right authentication for your Meraki Client VPN can feel daunting, but it really comes down to balancing security needs with operational simplicity. This table breaks down the most common options to help you choose the best fit, especially if you're managing a BYOD, Retail, or Education network.
| Authentication Method | Best For | Security Level | Setup Complexity |
|---|---|---|---|
| Meraki Cloud Auth | Small teams, quick setup, or when no existing directory is available. | Basic | Low |
| Active Directory | Organizations already using Microsoft AD for user management. | High | Medium |
| RADIUS | Complex environments needing granular control and vendor interoperability. | High | High |
| IPSK/EasyPSK | BYOD environments, guest networks, or IoT devices where per-device keys are needed. | Medium-High | Medium |
Each method has its place. For a small business just starting out, Meraki Cloud Authentication is fast and effective. But for an established company with an IT infrastructure built around Active Directory, leveraging that existing system is the clear winner for both security and user convenience.
Going Beyond a Single Shared Password
In any modern network, especially one with a BYOD policy, relying on a single, shared password for VPN access is a major security risk. It's an outdated practice. This is exactly where more advanced authentication solutions like Identity Pre-Shared Keys (IPSK) and EasyPSK change the game for both Wi-Fi and VPN access.
Instead of one password for everyone, IPSK lets you generate a unique, individual key for every single user or device. This is a huge leap forward. If a phone is lost or an employee leaves the company, you simply revoke their specific key. Nobody else is affected. It delivers enterprise-grade security to networks that might have previously settled for something simple like a basic Captive Portal.
I always explain it like this: a shared password is the master key to an entire apartment building. IPSK is a unique key for each resident's individual apartment door. It provides much more granular, and frankly, more sensible, control over who gets in where.
This is particularly effective in Education and Retail, where you have high device turnover and a constant need for strong, yet manageable, security.
Tying Into Your Existing User Directory
For most established organizations, the holy grail is single sign-on. Tying your Cisco Meraki VPN into an existing Active Directory is a smart, efficient strategy. It means your users can connect with the same username and password they use for their email and computer login. It’s simpler for them and a lot less administrative work for you. For a detailed walkthrough of this process, our guide on Cisco Meraki Active Directory and LDAP server support is a great resource.
This kind of seamless integration is a big reason why Cisco Meraki has become so popular. Their success comes from making powerful features like the integrated client vpn meraki accessible to businesses that need scalable and secure remote access without a ton of complexity.
Fine-Tuning Access with Firewall and Traffic Rules
Getting users authenticated and connected is only half the battle. The next critical step is controlling what they can actually access on the network. Fortunately, the Meraki Dashboard makes setting up firewall rules and traffic shaping policies incredibly straightforward.
Once a user connects, you can instantly apply policies to:
- Prioritize video conferencing traffic for corporate employees to keep those remote meetings running smoothly.
- Block access to sensitive financial servers for anyone connecting from the student network on an Education campus.
- Limit bandwidth for streaming services to ensure mission-critical Retail point-of-sale systems always have the network performance they need.
These rules are applied the moment a user connects through the client vpn meraki. This gives you the precise, real-time control needed to make sure your security posture extends far beyond the initial login.
Getting Your End-User Devices Connected
You've done all the heavy lifting in the Cisco Meraki dashboard, but the job isn't done until your team is securely connected. Now it's time to shift focus to the end-user experience, which is arguably the most critical piece of the puzzle. A perfectly configured VPN is useless if nobody can get on it.
One of the best things about the client vpn meraki setup is its reliance on the native VPN clients already built into every major operating system. There’s no clunky, third-party software for your users to download and install.
From an IT perspective, that’s a massive win. It simplifies deployment, cuts down on troubleshooting, and means you won't get a flood of support tickets right after launch.
Supporting a World of Different Devices
This native-client approach is a lifesaver in modern, device-diverse environments. Whether you're managing a corporate BYOD policy, a Retail store, or a university campus in the Education sector, you’re almost always dealing with a mix of hardware you don't fully control.
Your users are probably connecting from a wide range of devices:
- Windows Laptops: Still the workhorse in most corporate settings.
- macOS Devices: A common sight, especially in creative and executive teams.
- iOS and Android: Essential for any staff members who need to connect while on the move.
Because Meraki’s client VPN uses the built-in L2TP/IPsec capabilities of these platforms, the setup process feels consistent and familiar to users. You avoid the headache of becoming an expert on four different proprietary apps just to get your team online.
Think of it this way: you're not asking users to learn a new system. You're just guiding them through a few settings already on the devices they use every single day. That small shift makes a huge difference in adoption.
Creating Simple, Shareable Instructions
Your next task is to create some clear, easy-to-follow documentation. The goal isn't to write a dense technical manual; it's to build a simple, jargon-free guide you can hand directly to your users. Often, a one-page PDF or a quick post on your internal wiki is all you need.
Make sure to highlight the handful of key details they’ll need to enter:
- Server Address: The hostname or IP address you set up in the dashboard.
- Account Name/Username: Their specific login credential.
- Password: The password associated with their account.
- Shared Secret: The pre-shared key you configured for the VPN.
Screenshots are your best friend here. A quick visual walkthrough for each operating system removes the guesswork and empowers people to get connected on their own. This proactive step will dramatically slash the support burden on your IT team, freeing you up for more important work. This is a foundational part of any successful rollout, especially when managing complex device ecosystems. If you need more structure, our insights on creating a strong bring your own devices policy offer a great framework.
These simple guides are invaluable. They not only help with the initial connection but also act as a quick-reference for the future, ensuring your client vpn meraki deployment is a self-sustaining success.
Testing and Troubleshooting Your VPN Connection
You’ve gone through the steps to configure your client VPN in Meraki, but you're not quite done. Now comes the most important part: making sure it actually works. A remote access setup that only works on paper isn't much use, so proper testing and knowing where to look when things go wrong is what really matters.
The good news is that the Cisco Meraki dashboard gives you some fantastic built-in tools for instant visibility. You won’t have to SSH into a box or dig through cryptic server logs. Instead, you can get a clear picture right from your browser, which makes the whole troubleshooting process a lot less painful.
Using the Meraki Dashboard to Verify Connections
Your first port of call should always be the Client List. Just head over to Network-wide > Clients in the dashboard. From there, you can filter down to see only the VPN clients. This view is basically your command center, showing you who’s connected, the device they’re on, and how much data they're using. It’s the fastest way to get a thumbs-up that a connection is live.
If you suspect a problem, the Event Log is your best friend. You'll find it under Network-wide > Monitor > Event Log. This is where the dashboard leaves you a trail of breadcrumbs for any issue. Filter for "Client VPN" events, and you'll see every connection attempt—both the successes and the failures, along with the reason why it failed. Honestly, it's an invaluable tool for getting ahead of problems before a user even has time to raise a support ticket.
Common Pitfalls and How to Fix Them
Even with a setup as straightforward as Meraki's, a few common issues can still trip you up. I’ve seen these same problems pop up again and again, whether in a large school district or a small business with a few Retail locations.
Here are the usual suspects to check first:
- Mismatched Shared Secret: This is, without a doubt, the number one culprit. A single typo in the pre-shared key on the user's device or in the dashboard will kill the connection instantly. Always copy and paste, or just double-check it carefully.
- Authentication Errors: If you're using Meraki Cloud, RADIUS, or Active Directory for authentication, keep an eye on the Event Log for "authentication failed" messages. This almost always points to a wrong password or a problem with the user's account being disabled or locked out.
- Firewall Rules: Sometimes the problem isn't on your end. An overly aggressive firewall on the user's local network—like at a hotel or a public coffee shop—can block the ports needed for the VPN to connect.
- Subnet Conflicts: This one can be tricky to diagnose. If a user’s home network happens to use the same IP subnet as your corporate network (a classic example is both using 192.168.1.0/24), it creates routing confusion. The user's computer won't know whether to send traffic to the local network or through the VPN tunnel.
The key thing to remember is that most client VPN issues boil down to credentials or network conflicts. The Event Log is your source of truth and will almost always point you in the right direction, saving you from hours of guesswork.
In some cases, network problems can be more complex, especially when it comes to assigning IP addresses. If you think there’s an issue with IP leasing, our guide on what to do when a DHCP server is not responding can give you some more advanced diagnostic steps.
Finally, the reliability of your hardware plays a huge role in providing a stable VPN experience. Cisco Meraki’s MX appliances are well-known for their solid performance, with some of the higher-end models supporting client VPN throughput of up to 2 Gbps. It's not uncommon to hear IT pros praise their "amazing reliability," with some reporting years of service with zero downtime. You can find more real-world insights about Meraki's performance and user satisfaction on stratusinfosystems.com. This dependable foundation is what makes your client VPN a tool your team can truly count on.
Answering Your Top Meraki Client VPN Questions
When you're knee-deep in a client vpn meraki setup, a few questions always pop up. I've run into them time and again, so let's get you some quick, clear answers to help you button up your deployment and understand the little details that matter.
Can I Keep VPN Clients From Seeing Each Other?
Excellent question. This is a big deal, especially if you're setting up access for guests, contractors, or a BYOD program in a corporate, Education, or Retail environment.
On a standard Cisco Meraki wireless access point (AP), you can just flip a switch for client isolation, and devices on the same Wi-Fi network can't communicate with each other. Simple.
But here's the catch: the built-in wireless on an MX security appliance doesn't have that same Layer 2 isolation feature. The best practice for isolating clients on an MX is to use VLANs. You'll want to create a dedicated guest VLAN, tag your Guest SSID to it, and then use firewall rules to block traffic between clients on that network.
How Should I Handle User Accounts for the VPN?
This all comes down to the authentication solution you picked. If you're going with Meraki Cloud Authentication, you'll do everything right from the dashboard. Just head over to Network-wide > Configure > Users.
From that screen, you can easily:
- Add new users with an email and password.
- Set expiration dates for accounts (perfect for temporary staff or guests).
- Enable or disable users with a single click.
It’s a great, straightforward solution for any network that doesn't already have something like Active Directory in place. For larger or more complex environments like those in corporate or education sectors, you'll likely want to integrate with your existing Active Directory or RADIUS server. This keeps all your user management centralized where it belongs.
Does the Client VPN Need Its Own License?
Nope! This is one of the best parts. You don't have to buy a separate license just for the client vpn meraki feature.
The functionality is baked right into your MX security appliance's existing license. As long as your Meraki MX is licensed and active, you have full access to configure and use the Client VPN. It's a simple, all-in-one approach that keeps your licensing clean and your costs predictable.
One of the biggest wins with the Meraki ecosystem is that core features like Client VPN are just part of the package. You can roll out secure remote access without sweating hidden fees or surprise add-on license costs.
This integrated model is a huge help for organizations where budgets are tight but secure connectivity is non-negotiable, like in schools and Retail stores. By including this feature, Cisco Meraki makes robust remote access a realistic goal for just about anyone.
Ready to take your Cisco Meraki network to the next level with powerful authentication and guest Wi-Fi solutions? Splash Access offers seamless integration to create secure, branded, and intelligent captive portals. Explore our solutions today.


